matt
How to Remove Mold From a Keurig Coffee Maker Using White Vinegar
Click Here For Easy Mold Removal
If you’ve noticed a musty taste in your morning cup or spotted dark specks inside your Keurig, you’re likely dealing with mold. The warm, moist environment inside a coffee maker is a breeding ground for mold and mildew — especially in the internal water reservoir where the heating element keeps things damp between brews. The good news is that a simple white vinegar solution can eliminate mold, dissolve mineral buildup, and leave your machine running like new.
Here’s exactly how to do it, step by step.
Why Mold Grows Inside a Keurig
Keurig machines store water in an internal reservoir that stays warm thanks to the heating element. That combination of moisture, warmth, and darkness creates ideal conditions for mold growth. If you don’t run your machine daily, or if you leave water sitting in the reservoir for extended periods, mold and bacteria can take hold quickly.
Beyond the visible water tank, mold can hide in areas you can’t easily see — the internal tubing, the needle assembly, and the interior walls of the heated reservoir. That’s why a surface wipe-down isn’t enough. You need a cleaning solution that can circulate through the entire brewing system.
If you’re also dealing with pests attracted to the damp environment around your coffee station, check out our guide on how to get rid of fruit flies in your coffee maker — they often go hand in hand with mold issues.
What You’ll Need
- White distilled vinegar (at least 16 oz)
- Fresh water
- A large ceramic mug
- A clean cloth or sponge
- A soft-bristle brush or old toothbrush (optional, for scrubbing visible mold)
- Dish soap

Click Here For Easy Mold Removal
Step 1: Disassemble and Hand-Wash the Removable Parts
Start by powering off and unplugging the machine. Remove the water reservoir lid, the drip tray, and the K-Cup pod holder. Wash each of these parts with warm water and a few drops of dish soap. If you see visible mold on any of these components, scrub the affected areas with a soft-bristle brush. Rinse everything thoroughly and set the parts aside to air dry.
For a deeper walkthrough on cleaning the exterior and removable components, our full guide on how to clean a Keurig coffee maker and make it look new covers every detail.
Step 2: Mix Your 50/50 White Vinegar Solution
Fill the water reservoir with a mixture of equal parts white distilled vinegar and fresh water. For most Keurig models, this means roughly 8 oz of vinegar and 8 oz of water, but you can scale up depending on your reservoir size. The goal is to fill the reservoir to the maximum fill line with this half-and-half solution.
White vinegar is effective here for two reasons. First, the acetic acid kills mold and mildew on contact. Second, it dissolves the calcium and lime deposits — also known as scale — that accumulate over time inside the internal reservoir and around the heating element. This means you’re tackling both mold removal and descaling in a single process.
Using quality water going forward can help prevent heavy mineral buildup. If you’re curious about how water quality affects your coffee and your machine’s longevity, take a look at our breakdown of the best water for coffee and espresso.
Step 3: Let the Vinegar Solution Sit Inside the Machine
This is the most important step that people often skip. After filling the reservoir with the vinegar-water mixture, do not immediately start running brew cycles. Instead, let the solution sit inside the machine for at least 30 minutes — and ideally up to 4 hours if you suspect significant mold growth or heavy scale buildup.
Here’s why this matters: the internal water reservoir that houses the heating element is where the worst buildup occurs. When you let the vinegar solution soak, the acetic acid has time to penetrate mold colonies, break down biofilm, and dissolve the mineral scale that clings to the heating element and the interior walls of the reservoir. Running brew cycles right away only pushes a small amount of solution through the system at a time. The soak gives the cleaner time to work its magic on the parts you can’t reach or see.
If your machine has been sitting unused for a while, or if you’ve noticed the descale indicator light coming on, the extended soak becomes even more critical. For more on dealing with that persistent descale notification, we have a dedicated guide on what to do when your Keurig descale light won’t turn off.
Step 4: Run Brew Cycles to Flush the System
After the vinegar solution has had time to soak, it’s time to flush it through the brewing system. Place a large mug on the drip tray and, without inserting a K-Cup pod, run a brew cycle on the largest cup setting. Discard the hot vinegar water after each cycle.
Repeat this process until the reservoir is empty. You’ll likely notice the water coming out is discolored or has visible particles — that’s the mold, mildew, and mineral deposits being flushed out.
For a complete walkthrough of the descaling process specific to your model, see our step-by-step guide on how to descale a Keurig. If you own a K-Mini or K-Mini Plus, those models have a slightly different process, which we cover in how to descale a Keurig K-Mini and K-Mini Plus.
Step 5: Rinse With Fresh Water
Once you’ve run the entire vinegar solution through the machine, fill the reservoir with plain fresh water and run at least three full brew cycles to flush out any remaining vinegar taste or residue. You may want to smell or taste a small sip of the water from the last cycle — if you detect any vinegar, run one or two more rinse cycles.
Step 6: Clean the Needle
Mold can also accumulate around the entry and exit needles that puncture K-Cup pods. Use a paperclip or the Keurig needle cleaning tool (if your model came with one) to carefully clear any debris from the needles. This prevents mold particles from ending up in your next cup of coffee.
The Cleaning Pod Alternative
Click Here For Easy Mold Removal
If you’d rather not deal with mixing vinegar, Keurig-compatible cleaning pods and descaling solutions are another solid option. Brands like Keurig’s own descaling solution, Urnex, and various third-party cleaning pods are designed to run through the machine just like a regular K-Cup. You simply insert the cleaning pod, run a brew cycle, and let the solution do the work.
Cleaning pods are especially convenient for routine maintenance between deeper vinegar cleans. They’re formulated to target both scale and organic buildup, and some include antibacterial agents specifically designed to address mold and mildew.
That said, for a machine with an active mold problem, the vinegar soak method described above is more thorough because you’re flooding the entire internal system — not just pushing a pod’s worth of solution through it. The ideal approach is to use the vinegar deep clean whenever mold is present, and then use cleaning pods every month or so for ongoing maintenance.

How This Helps Descale Your Keurig Too
Descaling and mold removal go hand in hand. The mineral deposits left behind by hard water create a rough surface inside the reservoir and along the heating element — and that rough surface gives mold an easier place to anchor and grow. By descaling with the vinegar solution, you’re smoothing out those surfaces and removing the environment mold needs to thrive.
Regular descaling also keeps your machine’s heating element working efficiently. When scale builds up on the element, it has to work harder to heat the water, which can lead to longer brew times, inconsistent temperatures, and eventually premature failure of the machine. The vinegar soak addresses all of this in one shot.
If you also own an electric kettle that you use alongside your Keurig for pour-over or other brewing methods, the same vinegar approach works beautifully — we’ve outlined the process in our guide on how to clean an electric kettle. And for Chemex owners, a related cleaning approach is covered in how to clean a Chemex coffee maker.
How Often Should You Clean Your Keurig?
As a general rule, aim for a full vinegar deep clean every 3 months, or more frequently if you live in an area with hard water or if the machine sits idle for days at a time. In between deep cleans, using a cleaning pod once a month keeps things fresh. Empty the water reservoir every night if you’re not brewing daily, and leave the lid open to allow the interior to dry out — this alone goes a long way toward preventing mold growth.
For a broader look at keeping your entire coffee setup in top shape, our guide on how to clean, prevent, and upgrade your coffee station covers everything from machine maintenance to countertop organization. And if you’re interested in reducing mineral buildup at the source, consider a pitcher or carbon filter for your coffee water.
Quick Summary
- Disassemble and hand-wash all removable parts with soap and water.
- Fill the reservoir with a 50/50 white vinegar and water mixture.
- Let the solution sit for 30 minutes to 4 hours so it can break down mold and scale inside the internal reservoir and around the heating element.
- Run brew cycles without a pod until the reservoir is empty.
- Rinse with at least three full reservoirs of fresh water.
- Clean the needles to remove any remaining debris.
- Use cleaning pods monthly for ongoing maintenance between deep cleans.
A clean Keurig doesn’t just look better — it brews better. Once you’ve got your machine back in shape, try putting it to work with a great iced coffee using your Keurig. You’ll taste the difference immediately.
best espresso machine under 300
You do not need to spend a fortune to start pulling real espresso at home. The under-$300 price range has improved dramatically in recent years, with machines that offer genuine 9-bar extraction, PID temperature control, and steam wands capable of producing actual microfoam — features that were reserved for $500+ machines not long ago. The tradeoffs at this price are mostly in build materials and accessories, not in espresso quality.
Below are the best espresso machines you can buy for under $300, followed by practical advice on what to look for and what to pair with your machine to get the best results.
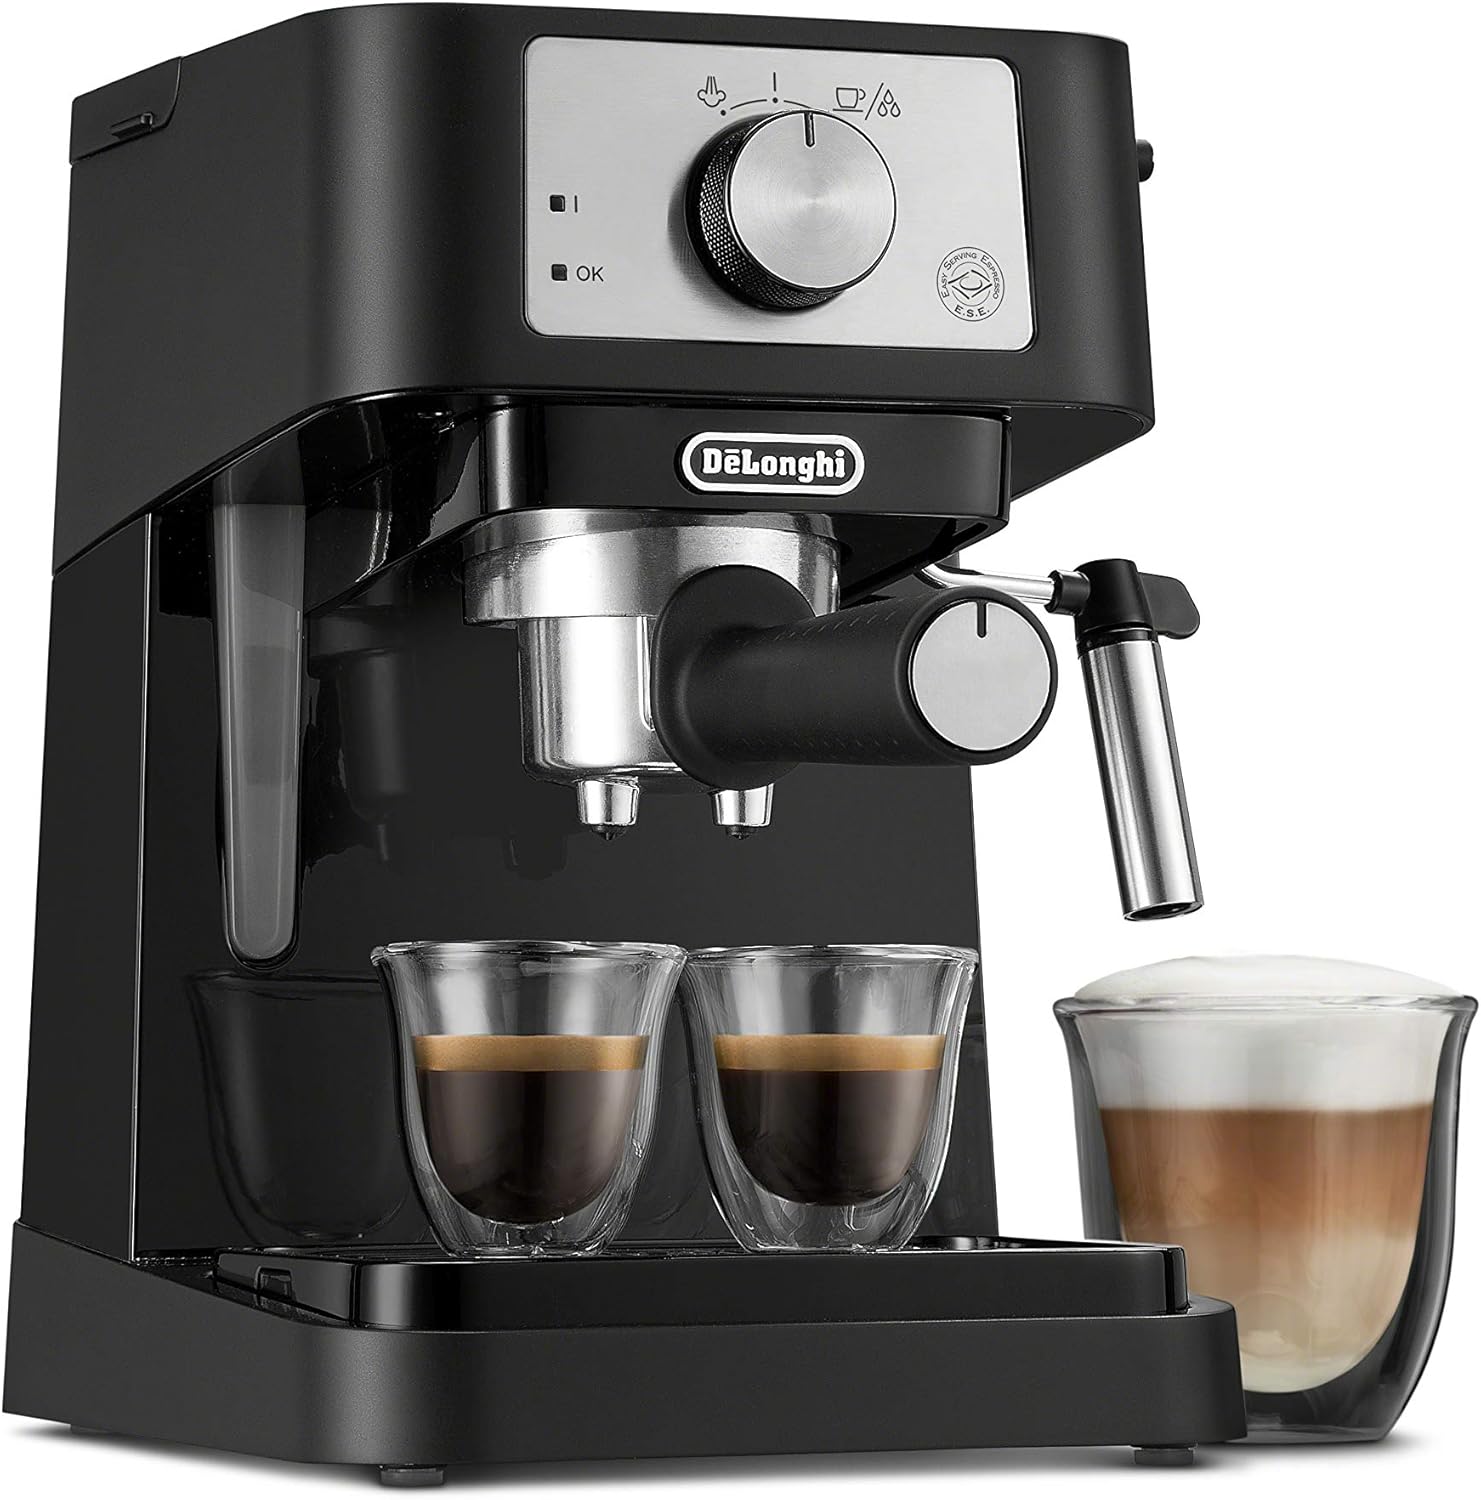
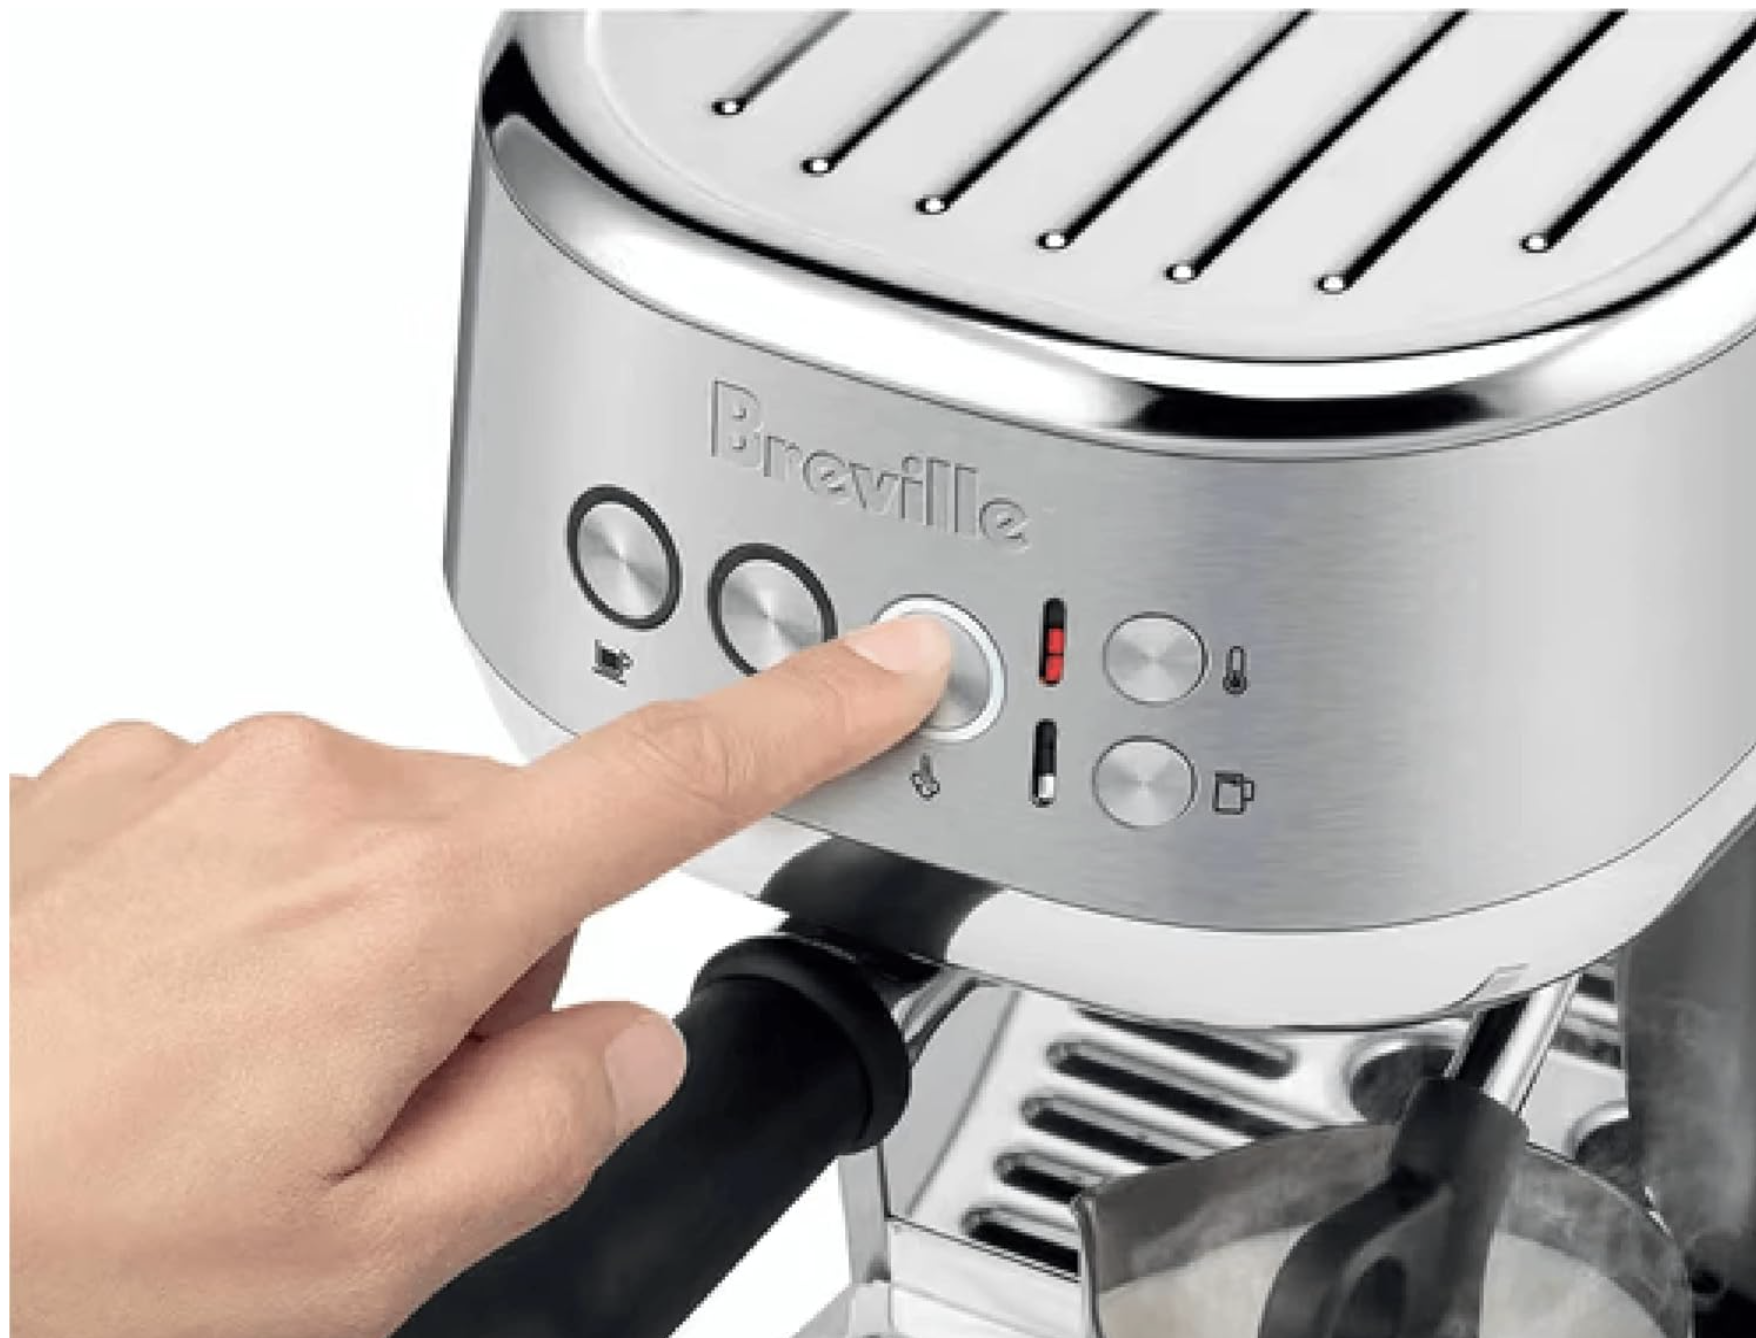
1: Breville Bambino BES450

The Breville Bambino is the consensus best espresso machine under $300 and the one recommended by CNN Underscored, Consumer Reports, and virtually every major coffee review site. At around $250–$300 (frequently on sale), it delivers performance that punches well above its price. The ThermoJet heating system reaches brewing temperature in approximately 3 seconds — faster than machines costing three times as much. It uses the same 54mm portafilter and low-pressure pre-infusion followed by 9-bar extraction found in higher-end Breville models. The manual steam wand produces genuine microfoam for latte art, not just bubbly froth. The compact footprint fits easily on small counters, and it is genuinely simple to use from day one.
The main tradeoff: no built-in grinder. You will need a separate burr grinder for the best results. That said, the included pressurized basket works well with pre-ground coffee if you want to start simple and upgrade later.
- ThermoJet heating — ready to brew in 3 seconds
- 54mm portafilter with 9-bar extraction
- Manual steam wand for real microfoam
- Extremely compact design
- Requires separate grinder for best results
2: Casabrews 3700 Essential

The Casabrews 3700 Essential is the surprise standout in the budget espresso space. In CNN Underscored’s testing, it outperformed every machine in its price range and even a couple of pricier models. It heats up quickly, pulls consistent double shots in under 20 seconds, and delivers rich, well-balanced espresso with good crema. The 20-bar pump system (which regulates down to optimal extraction pressure) and stainless steel construction give it a more substantial feel than many sub-$200 machines.
The honest limitations: the accessories feel cheap (the portafilter and tamper are where costs were cut), and securing the portafilter can shift the machine on the counter. These are common tradeoffs at this price point. But for espresso quality per dollar, the Casabrews 3700 is hard to beat.
- 20-bar pump with consistent extraction
- Stainless steel build at a budget price
- Fast heat-up and quick shot times
- Accessories are entry-level quality
- Excellent value for the price
3: De’Longhi Stilosa EC260BK
At roughly $150, the De’Longhi Stilosa is the cheapest true espresso machine worth buying. It is a real portafilter machine with a 15-bar pump and a stainless steel boiler built to last. The manual steam wand has a surprisingly good range of motion for this price and can produce decent microfoam with practice. Included are a portafilter, tamper, and filters for single and double shots.
The Stilosa is the ideal entry point if you want to learn espresso on a tight budget. It will teach you the fundamentals — dosing, tamping, extraction timing, milk steaming — without a huge financial commitment. If you decide you love the hobby, you can upgrade later knowing you have real skills. If you just want a simple daily espresso martini or a quick shot before work, the Stilosa does the job. Pair it with a grinder under $100 and quality espresso beans and you are set.
- Approximately $150 — one of the most affordable real espresso machines
- 15-bar pump with stainless steel boiler
- Manual steam wand with good range of motion
- Compact and lightweight
- Plastic portafilter and accessories are where costs are cut
4: Mr. Coffee Cafe Barista
The Mr. Coffee Cafe Barista takes a different approach: instead of asking you to learn steaming technique, it handles milk frothing automatically. One-touch buttons for espresso, cappuccino, and latte make this the simplest machine on the list. The automatic milk frother pulls from a removable reservoir that can be stored in the fridge between uses. The 15-bar pump pulls respectable shots, and the entire interface is just three buttons.
This is the best pick for someone who wants milk drinks every morning without thinking about extraction variables or learning to steam. The foam is more bubbly than silky (do not expect latte art), but for daily cappuccinos and lattes, it gets the job done with zero learning curve.
- One-touch buttons for espresso, cappuccino, and latte
- Automatic milk frother with fridge-safe reservoir
- 15-bar pump
- Three-button interface — no learning curve
- Foam quality is bubbly rather than silky microfoam
What to Know Before Buying an Espresso Machine Under $300
You will probably need a grinder. Most machines in this range do not include a built-in grinder. A burr grinder is strongly recommended over a blade grinder for espresso — the consistency of the grind matters more than almost any other variable. If budget is tight, check out our picks for the best coffee grinder under $100. Alternatively, you can start with pre-ground espresso and a pressurized basket (included with most of these machines), then upgrade to a grinder when you are ready.
Water quality matters more than you think. The minerals in your tap water affect both flavor and machine longevity. Using the right water for espresso — even a simple pitcher filter — can make a noticeable difference in taste and prevent scale buildup.
Descale regularly. Budget machines are just as susceptible to mineral buildup as expensive ones. Regular descaling keeps your espresso tasting right and extends the life of the machine. We have step-by-step guides for descaling Breville machines and other popular brands.
Beans matter as much as the machine. Even a $300 espresso machine can produce excellent shots with fresh, quality beans. Our guide to the best coffee beans for espresso will help you find the right roast for your setup.
Conclusion
The Breville Bambino is our top pick for most people shopping under $300. It delivers the same extraction quality as far more expensive machines in a compact, beginner-friendly package. If your budget is tighter, the De’Longhi Stilosa at around $150 proves you can get into real espresso for surprisingly little. And if convenience is your priority over control, the Mr. Coffee Cafe Barista handles everything automatically.
Whichever machine you choose, pair it with a decent grinder and fresh beans, and you will be pulling shots at home that rival what you get at a coffee shop — for a fraction of the daily cost. For more options at a higher price point, check out our guide to the best espresso machines overall.
Best super automatic espresso machine
Super-automatic espresso machines do everything for you — they grind the beans, dose, tamp, extract, and in most cases froth milk, all at the touch of a button. No portafilter. No tamping. No technique required. You load beans into the hopper, fill the water tank, press a button, and your drink appears. For busy mornings, households with multiple coffee drinkers, or anyone who values convenience over hands-on control, a super-automatic is the way to go.
The tradeoff is price and flexibility. Super-automatics cost more than semi-automatic machines, and they give you less control over the extraction process. But the best models in 2026 produce espresso that is genuinely impressive — smooth, full-bodied, and consistent cup after cup. Below are our top picks across a range of budgets.
1: De’Longhi Dinamica Plus
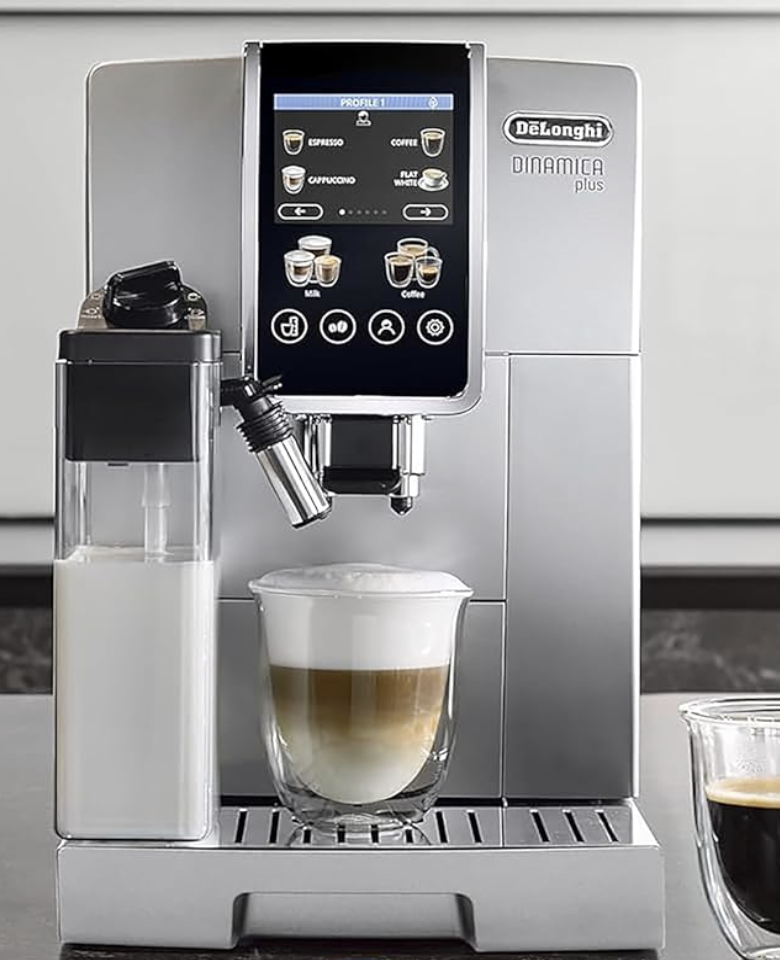
The De’Longhi Dinamica Plus is our top pick for the best overall super-automatic espresso machine. It hits the sweet spot between price, features, and espresso quality. The 3.5-inch touchscreen display makes drink selection and customization intuitive, and the LatteCrema milk system produces dense, silky froth that is a clear step above what most machines in this category deliver. With 16 drink options including espresso, cappuccino, latte, flat white, and even iced coffee (via the TrueBrew Over Ice feature), this machine covers virtually every drink you could want.
The 13-level stainless steel burr grinder adjusts well to different beans, and the machine is compatible with the De’Longhi Coffee Link app for even more customization. Espresso quality is consistently excellent — rich crema, good body, and balanced flavor. For daily use in a household that drinks a mix of black espresso and milk drinks, the Dinamica Plus is hard to beat.
- 3.5-inch touchscreen with 16 one-touch drink options
- LatteCrema milk system for dense, silky froth
- 13-level stainless steel burr grinder
- TrueBrew Over Ice for iced coffee drinks
- Compatible with De’Longhi Coffee Link app
2: Jura E8

The Jura E8 is a premium super-automatic that delivers some of the best espresso you can get from a bean-to-cup machine. Jura’s Pulse Extraction Process (P.E.P.) optimizes extraction time for shorter specialty coffees like ristretto and espresso, producing shots with more depth and complexity than most super-automatics manage. The Aroma G3 grinder is fast and consistent, and the machine offers 17 specialty drinks.
The E8 uses a fine foam frother with a milk tube system rather than an integrated carafe. This gives you excellent foam quality but means an extra cleaning step (the machine does have automatic rinsing). Build quality is outstanding — Jura machines are built to last and backed by solid warranties. The price is higher than the Dinamica Plus, but if espresso quality is your top priority and budget allows, the E8 delivers.
- Pulse Extraction Process (P.E.P.) for optimized short specialty drinks
- Aroma G3 grinder — fast and consistent
- 17 specialty drink options
- Premium build quality and longevity
- Higher price point than competitors
3: Philips 3200 Series with LatteGo

The Philips 3200 with LatteGo is the best value super-automatic on the market. It does not have the touchscreen of the Dinamica Plus or the extraction technology of the Jura, but it delivers reliable, good-tasting espresso and milk drinks at a significantly lower price. The LatteGo milk system is its standout feature: just two parts, no tubes, and it cleans in seconds. If you hate cleaning milk systems (and who doesn’t?), the LatteGo is a revelation.
The 12-setting ceramic burr grinder handles most bean varieties well, and the touch controls let you customize strength, volume, and temperature for each drink. Five drink presets cover espresso, cappuccino, latte, Americano, and coffee. This is the machine we recommend for someone buying their first super-automatic who does not want to spend $1,000+.
- LatteGo milk system — just 2 parts, cleans in seconds
- 12-setting ceramic burr grinder
- Touch controls with customizable strength, volume, and temperature
- Most affordable quality super-automatic option
- Fewer drink options and less customization than premium models
4: De’Longhi Magnifica Evo with LatteCrema

The Magnifica Evo sits between the Philips 3200 and the Dinamica Plus in both price and features. It includes the LatteCrema automatic milk system (the same one used in the Dinamica Plus), Over Ice technology for iced drinks, and 7 one-touch drink recipes. The grinder offers 13 settings, and the interface is straightforward with clearly labeled buttons.
Where the Magnifica Evo stands out is as an entry point into the LatteCrema experience. The milk quality from this system is noticeably better than what most machines deliver at this price — thick, creamy, and consistent. If you drink a lot of lattes or flat whites, the milk system alone justifies choosing the Magnifica Evo over cheaper alternatives.
- LatteCrema automatic milk system for thick, creamy froth
- Over Ice technology for iced coffee drinks
- 7 one-touch drink recipes
- 13-setting grinder
- Good value entry point for quality automatic milk
5: Gaggia Brera

The Gaggia Brera is the most affordable super-automatic worth considering. At around $600, it gives you the core bean-to-cup experience: built-in ceramic burr grinder, automatic brewing, and a pannarello steam wand for milk. It does not have an automatic milk system — you froth manually — but this actually gives you more control over milk texture and is an advantage if you want to learn the skill.
The Brera has a compact footprint, simple button interface, and uses some stainless steel in the construction. Espresso quality is solid for the price, with good crema and body. Gaggia has a long history of making reliable espresso machines, and the Brera benefits from that engineering heritage. If you want a super-automatic under $700 that pulls decent shots and does not take up too much counter space, this is the one to get.
- Most affordable quality super-automatic (around $600)
- Built-in ceramic burr grinder
- Manual pannarello steam wand — more control over milk texture
- Compact footprint
- No automatic milk system
Semi-Automatic vs. Super-Automatic: Which Is Right for You?
If you enjoy the hands-on process of making espresso — dialing in the grind, tamping, timing the shot, steaming milk — a semi-automatic machine will give you better espresso for less money. If you want great coffee with zero effort, a super-automatic is the right choice.
Super-automatics excel when multiple people in a household drink different drinks (one person wants a ristretto, another wants a latte) or when convenience is the top priority. They are also easier to keep clean in terms of daily workflow — no spent pucks, no portafilter to rinse, no milk pitcher to wash (if the machine has an automatic milk system).
The main downside is that super-automatics give you less control over the extraction, which means you cannot fine-tune shots the way an experienced home barista can with a semi-automatic. For most people, the convenience tradeoff is worth it.
Regardless of which type you choose, water quality and regular descaling matter. Check out our guide to the best water for coffee and espresso and our descaling guides to keep your machine running at its best.
Conclusion
The Philips 3200 Series with LatteGo is our top overall pick for combining excellent espresso quality, a great milk system, and a fair price. If you want the best possible espresso from a super-automatic and budget is less of a concern, the Jura E8 is the one to get. For the best value entry point, the Philips 3200 with LatteGo delivers reliable quality with the easiest milk system to clean. And if you want to stay under $700, the Gaggia Brera gives you a real super-automatic experience with a quality grinder and manual steam wand.
The best beans make a real difference in any machine. Our guides to the best espresso beans and best latte beans can help you find the right roast for your setup.
Best drip coffee maker
Drip coffee makers are the most popular way to brew coffee in America, and for good reason — they are consistent, hands-off, and can brew enough coffee for a whole household in minutes. But not all drip machines are created equal. The difference between a cheap drip maker and a good one is dramatic: brew temperature consistency, even water distribution over the grounds, and carafe quality all affect whether your daily cup tastes rich and balanced or flat and bitter.
The machines below were selected based on brew quality, reliability, ease of use, and value. Whether you want a no-frills $30 machine or a premium brewer that rivals pour-over quality, there is an option here for you.
1: Technivorm Moccamaster KBGV Select

The Technivorm Moccamaster is the gold standard of drip coffee makers and has been for decades. Handmade in the Netherlands with a copper heating element that maintains precise water temperature throughout the brew cycle, it produces coffee that is noticeably better than what most drip machines deliver. The showerhead design distributes water evenly over the grounds — similar to a manual pour-over — which results in more complete extraction and a fuller, more complex flavor.
A full 10-cup carafe brews in under 6 minutes, and the adjustable drip-stop lets you grab a cup mid-brew. The machine is SCA (Specialty Coffee Association) certified, meaning it meets the industry’s highest standards for brew temperature and contact time. Available in both glass carafe (with adjustable hot plate) and thermal carafe versions in a huge range of colors. The price is premium, but the 5-year warranty and lifetime repair guarantee mean this is likely the last drip machine you will ever buy.
Pair it with freshly ground medium-coarse beans and filtered water for the best results.
- Copper heating element for precise temperature control
- SCA certified — meets specialty coffee brewing standards
- Brews 10 cups in under 6 minutes
- Handmade in the Netherlands with 5-year warranty
- Premium price point ($300+)
2: Breville Precision Brewer

The Breville Precision Brewer is the most customizable drip coffee maker on the market. It offers six preset brewing modes including the SCA-certified Gold Cup mode, plus the ability to manually adjust bloom time, brew temperature, and flow rate. This level of control is unheard of in a drip machine and gives you the ability to fine-tune your coffee to match specific beans and roast profiles. If you are the kind of person who enjoys dialing in your coffee, this is the drip maker for you.
The Over Ice mode brews a concentrated batch directly over ice for a smooth iced coffee — a great alternative to the cold brew process when you do not want to wait 12–24 hours. The thermal carafe keeps coffee hot without a hot plate, avoiding that burnt taste. It is also compatible with pour-over adapters and a flat-bottom basket for even more brewing flexibility. If you already have a Chemex, the Precision Brewer can automate the pour-over process for you.
- Six preset modes plus fully customizable bloom, temperature, and flow
- SCA-certified Gold Cup mode
- Over Ice mode for quick iced coffee
- Thermal carafe — no hot plate
- Compatible with pour-over adapters
3: Ninja CE251 Programmable Brewer
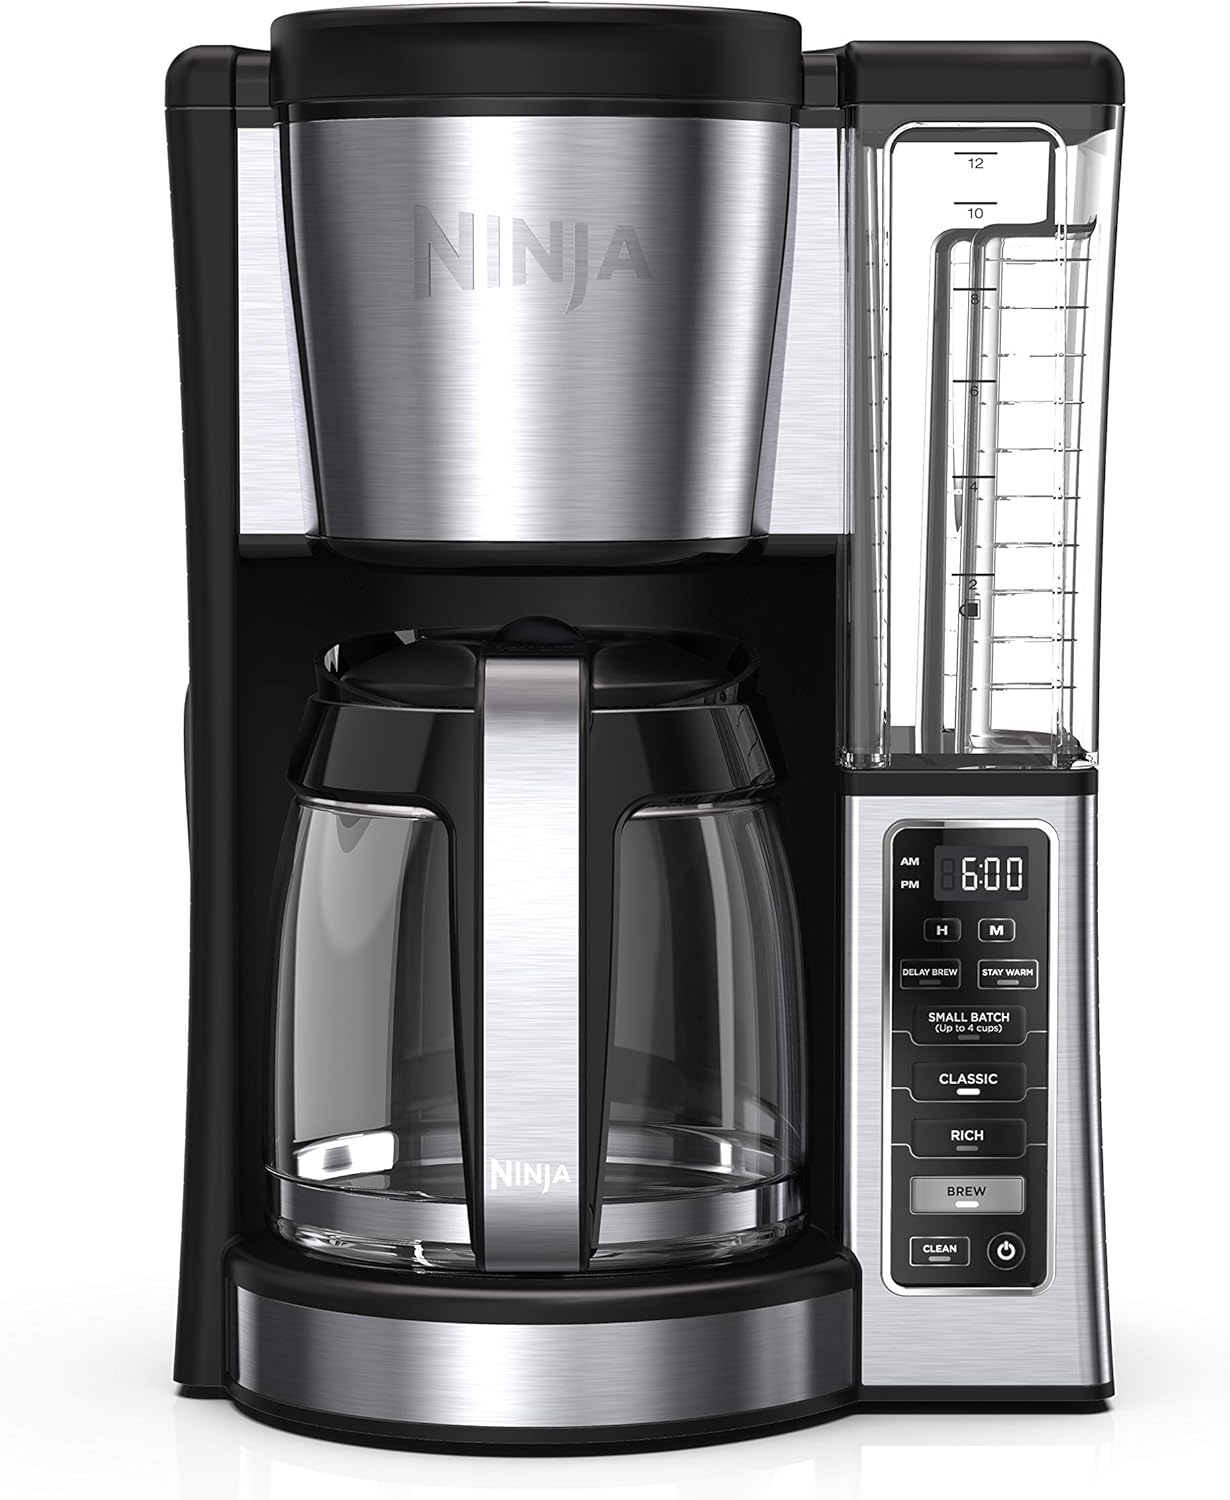
The Ninja CE251 is the best budget drip coffee maker for most people. At under $100, it delivers surprisingly good brew quality with a few features that more expensive machines often lack: a keep-warm function that maintains temperature for up to 4 hours (without scorching), a mid-brew pause so you can pour a cup before the pot finishes, and a compact design that does not dominate the counter.
It brews up to 12 cups (roughly 5–6 real mugs), and the brewing temperature is consistent enough to produce a clean, flavorful pot. This is not an SCA-certified machine, but for everyday home brewing, the Ninja CE251 punches well above its price. It is the machine to get if you want reliable drip coffee without spending more than $100.
- Under $100 — best budget pick
- Keep-warm for up to 4 hours without scorching
- Mid-brew pause for grabbing a quick cup
- Compact design
- Not SCA certified but consistent brew temperature
4: Cuisinart PerfecTemp 14-Cup DCC-3200

The Cuisinart PerfecTemp is a long-standing favorite in the drip coffee world and consistently earns top marks from Consumer Reports for brew quality and owner satisfaction. It features a 14-cup capacity (the largest on this list), a brew-strength selector, adjustable keep-warm temperature, and full programmability so you can set it to brew before you wake up.
The glass carafe with adjustable hot plate keeps coffee at the temperature you prefer. A charcoal water filter is included to improve water quality — a smart inclusion since water quality directly affects how your coffee tastes. For a large household or anyone who goes through a lot of coffee, the Cuisinart DCC-3200 is the best combination of capacity, features, and reliability at a reasonable price.
- 14-cup capacity — largest on this list
- Brew-strength selector and adjustable keep-warm temperature
- Fully programmable with auto-brew timer
- Includes charcoal water filter
- Glass carafe with hot plate (not thermal)
5: Hamilton Beach 12-Cup Programmable 49465R

The Hamilton Beach 49465R is one of the least expensive drip coffee makers that still brews excellent coffee. It is CR Recommended (Consumer Reports’ highest designation) and meets SCA temperature guidelines for optimal extraction. At under $40, that is remarkable. It is programmable, so you can set it to brew on a timer, and the brew performance is genuinely excellent for the price.
If you want the cheapest possible path to a good cup of drip coffee and do not need fancy features, this is the one to get. Combine it with a burr grinder and fresh beans, and you will be surprised at how good drip coffee can be.
- Under $40 — cheapest recommended drip maker
- CR Recommended with excellent brew performance
- Programmable with auto-brew timer
- Meets SCA temperature guidelines
- Basic feature set — no brew strength selector
Getting the Best Coffee From Your Drip Machine
The machine matters, but so does everything you put into it. A few tips that make a real difference:
Grind fresh. Pre-ground coffee starts going stale within minutes of grinding. Even an inexpensive burr grinder will improve your drip coffee noticeably. Use a medium grind — finer than French press but coarser than espresso.
Use filtered water. Tap water minerals can mute flavors or add off-tastes. A simple pitcher or carbon filter is enough to make a difference.
Clean your machine regularly. Mineral buildup affects both flavor and machine performance. Regular descaling and cleaning keeps things tasting fresh.
Use the right ratio. The SCA recommends roughly 1:15 to 1:18 coffee-to-water by weight. Our coffee ratio chart can help you dial in the right amount.
Conclusion
The Technivorm Moccamaster KBGV is the best drip coffee maker you can buy — period. The brew quality, build quality, and warranty justify the premium price for anyone who drinks drip coffee daily. The Breville Precision Brewer is the pick for tinkerers who want maximum control. And for budget buyers, the Hamilton Beach 49465R proves you can get genuinely excellent drip coffee for under $40.
Best espresso machine for beginners
Getting into espresso at home can feel intimidating. There are grind settings to learn, tamping pressure to figure out, extraction times to worry about, and milk steaming techniques that take practice. The good news is that the right machine makes the learning curve much more manageable — and some machines are specifically designed to be forgiving while you build your skills.
The best beginner espresso machine is one that produces good espresso without demanding perfection from you, has room to grow as your skills improve, and does not cost so much that you feel locked in if you decide espresso is not your thing. Here are our top picks for 2026.
1: Breville Bambino BES450
The Breville Bambino is the best espresso machine for beginners by a wide margin. It combines real espresso performance with a design that is genuinely easy to use from day one. The ThermoJet heating system is ready to brew in 3 seconds — no waiting, no temperature surfing, no guesswork. The included pressurized basket is forgiving of grind inconsistencies, which means you can start with pre-ground coffee and still get a respectable shot while you learn.
When you are ready to level up, switch to the included non-pressurized basket with freshly ground beans from a burr grinder, and the Bambino will keep up with your improving skills. The 54mm portafilter and 9-bar extraction produce real espresso — this is not an “espresso-style” machine. The manual steam wand takes some practice, but it teaches you proper technique and can produce genuine microfoam for flat whites and cappuccinos.
- ThermoJet heating — 3-second startup, no waiting
- Pressurized basket for beginners, non-pressurized for growth
- 54mm portafilter with genuine 9-bar extraction
- Manual steam wand teaches real technique
- Compact design at around $250–$300
2: Breville Barista Express BES870XL

The Barista Express is the best all-in-one option for beginners who want to skip buying a separate grinder. The built-in 16-setting conical burr grinder means you go from whole beans to espresso in one machine — no extra equipment, no extra counter space, and one less variable to figure out. The grinder doses directly into the portafilter, which simplifies the workflow significantly.
The same low-pressure pre-infusion and 9-bar extraction found in commercial-style machines ensures you are learning on a setup that produces real espresso. The PID temperature control keeps the water consistent shot to shot, and the manual steam wand gives you full control over milk texture. This machine is a bigger investment than the Bambino, but the included grinder saves you $100–$200 and removes a significant barrier to entry. We have a full guide on descaling Breville machines to keep it performing well.
- Built-in 16-setting burr grinder — no separate grinder needed
- PID temperature control for consistency
- Low-pressure pre-infusion with 9-bar extraction
- Manual steam wand for learning latte art
- Higher price but eliminates need for separate grinder
3: De’Longhi Stilosa EC260BK
At around $150, the Stilosa is the cheapest way to start learning real espresso. It is a genuine portafilter machine with a 15-bar pump, stainless steel boiler, and manual steam wand. The feature set is stripped down — no PID, no programmability — but that simplicity is actually an advantage for beginners. Fewer settings means fewer things to go wrong, and you can focus on the fundamentals: grind, dose, tamp, extract.
The manual steam wand has better range of motion than most machines at this price, and the included portafilter and tamper get you started right away. The honest limitation is the plastic accessories — the portafilter feels flimsy compared to higher-end machines. But if you are testing whether home espresso is for you without a big financial commitment, the Stilosa is the right machine. Pair it with a grinder under $100 and quality espresso beans for the best experience.
- Around $150 — lowest cost real espresso machine
- 15-bar pump with durable stainless steel boiler
- Simple design with no complicated settings
- Manual steam wand with good range of motion
- Plastic portafilter and accessories
4: Mr. Coffee Cafe Barista

The Mr. Coffee Cafe Barista is the best beginner machine for people who specifically want milk drinks without any learning curve. The automatic milk frother handles everything — just fill the reservoir, press the cappuccino or latte button, and the machine brews the espresso and froths the milk for you. There is no steaming technique to learn, no milk thermometer to worry about, and no cleanup of a steam wand.
The espresso itself is decent (15-bar pump, pressurized portafilter), and the one-touch interface is genuinely foolproof. The tradeoff is that you have very limited control, and the foam quality is more bubbly than silky. You will not be making latte art with this machine. But if your goal is a simple, no-fuss cappuccino every morning, the Mr. Coffee Cafe Barista delivers that experience at a very affordable price.
- One-touch buttons for espresso, cappuccino, and latte
- Automatic milk frother — no technique required
- 15-bar pump with pressurized portafilter
- Extremely beginner-friendly with 3-button interface
- Limited control and bubbly (not silky) foam
5: Philips 3200 Series with LatteGo
If budget is not the primary concern and you want the absolute easiest path to good espresso, the Philips 3200 is a super-automatic that does everything. It grinds, doses, tamps, brews, and froths milk — all at the touch of a button. There is literally nothing for you to learn except which button to press. The LatteGo milk system is the easiest to clean of any automatic we have tested (just 2 parts).
The 12-setting ceramic grinder handles different beans well, and you can customize drink strength, volume, and temperature. This is the best pick for someone who wants cafe-quality drinks at home but has zero interest in learning espresso technique. It is also ideal for households where multiple people drink different things — one person’s ristretto is just as easy to make as another person’s latte. For more on super-automatics, see our full guide to the best super-automatic espresso machines.
- Fully automatic bean-to-cup — zero technique required
- LatteGo milk system with 2-part cleanup
- 12-setting ceramic burr grinder
- Customizable strength, volume, and temperature
- Higher price point but maximum ease of use
What Beginners Actually Need to Know
The grinder matters more than the machine. This is the single most important thing to understand about espresso. A cheap machine with a great grinder will outperform an expensive machine with a bad grinder. If you buy a semi-automatic machine (Bambino, Barista Express, or Stilosa), invest in the best burr grinder you can afford.
Start with the pressurized basket. Most beginner machines include both a pressurized and non-pressurized basket. The pressurized basket compensates for inconsistent grinds and imperfect tamping. Start there, and switch to the non-pressurized basket once you have a good grinder and consistent technique.
Use fresh beans. Coffee starts going stale about 2–4 weeks after roasting. Buy from a local roaster or a brand that prints the roast date on the bag. Our guide to the best espresso beans can point you in the right direction.
Water quality affects everything. Even a perfect setup will taste wrong if your water is bad. Filtered water — even from a simple pitcher filter — can make a real difference.
Keep your machine clean. Backflush after every session (if your machine supports it), wipe the steam wand after every use, and descale on a regular schedule. We have guides for Breville, Breville Bambino, and Nespresso.
Conclusion
The Breville Bambino is the best espresso machine for beginners. It is easy enough to use on day one with pre-ground coffee, but has genuine room to grow as you develop your skills. The Barista Express is the best pick if you want an all-in-one setup with a built-in grinder. The Stilosa is the right call if you want to test the waters for under $150. And the Philips 3200 is perfect if you want zero learning curve and push-button convenience.
Start simple, use good beans, and enjoy the process — the best part of home espresso is that it only gets better as you learn.
breville bambino vs bambino plus
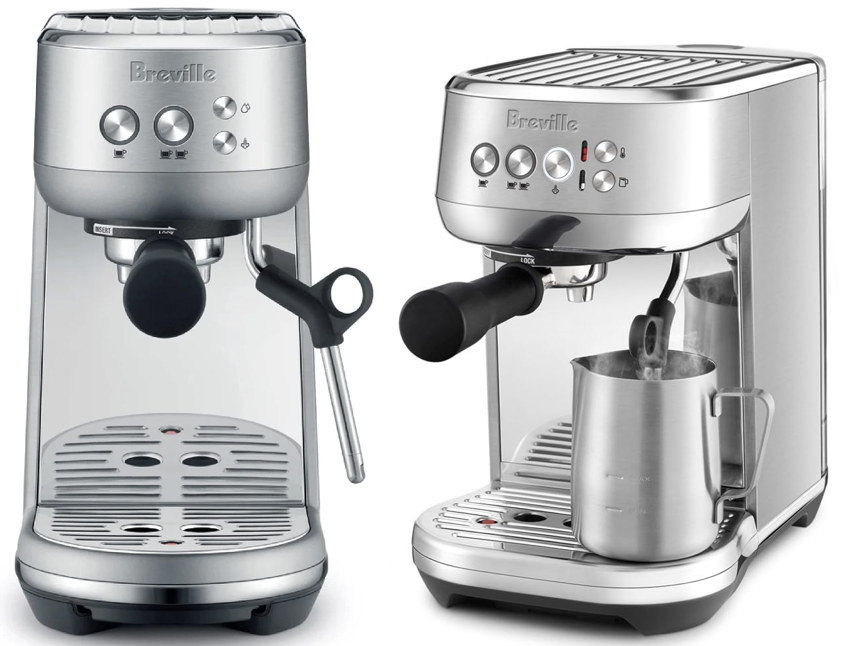
The Breville Bambino and Bambino Plus are two of the most popular entry-level espresso machines on the market, and they look nearly identical. Both use the same ThermoJet heating system, the same 54mm portafilter, and the same 9-bar extraction process. So what is the difference, and is the Plus worth the extra $150–$200? Here is a direct, no-fluff comparison to help you decide.
What They Share
Before getting into the differences, it is important to understand that these machines share the same core espresso engine. Everything that makes the espresso itself is identical:
The ThermoJet heating system reaches brewing temperature in approximately 3 seconds. Both machines use a 54mm stainless steel portafilter with 18 grams of coffee for full flavor. Both deliver low-pressure pre-infusion followed by 9-bar extraction — the same pressure profile used in commercial machines. Both include a pressurized basket (beginner-friendly) and a non-pressurized basket (for use with a proper burr grinder). Both have a compact footprint that fits easily in small kitchens.
The espresso you pull from a Bambino and a Bambino Plus — using the same beans, same grind, same dose — will taste the same. The differences are all about the milk system and a few convenience features.
The Key Differences
Steam Wand: Manual vs. Automatic
This is the biggest difference and the main reason the Plus costs more.
The Bambino has a manual steam wand. You control the wand position, milk pitcher angle, and timing yourself. This gives you full control over milk texture — you can make silky microfoam for latte art or thicker froth for cappuccinos. The tradeoff is a learning curve. It takes practice to get consistent results, and your first few attempts will probably be more bubbly than silky. But once you learn, the manual wand gives you better control than any automatic system.
The Bambino Plus has an automatic steam wand. You set your desired milk temperature and texture level, press the steam button, and the machine handles the rest. It produces consistent, good-quality microfoam every time with no technique required. The Plus also lets you adjust the temperature for different types of milk (dairy, oat, almond, etc.), which is a genuine advantage since alternative milks froth differently at different temperatures.
Bottom line: If you want to learn milk steaming technique and eventually do latte art, the manual wand on the standard Bambino is actually the better choice. If you want consistent, no-effort milk foam every time, the automatic wand on the Plus is worth the premium.

Auto-Purge
The Bambino Plus automatically purges the heating system after steaming to bring the temperature back down to the correct brewing range. This means you can steam milk and then immediately pull another shot without waiting or manually flushing.
The standard Bambino does not have auto-purge. After steaming, you need to run a brief water flush to cool the thermoblock before your next espresso shot. This adds about 10–15 seconds to your workflow. Not a big deal for most people, but something to be aware of if you are making multiple drinks back to back.
Milk Temperature and Texture Control
The Bambino Plus lets you adjust milk temperature to three levels and texture to three levels, giving you 9 combinations. This is particularly useful for alternative milks — oat milk, for example, tends to scorch at the temperatures used for dairy, so being able to dial down the temperature is a real advantage.
The standard Bambino gives you full manual control, which technically means infinite adjustment, but requires you to develop the feel for it yourself.
Warranty
The Bambino comes with a 1-year warranty. The Bambino Plus comes with a 2-year warranty. If longevity and peace of mind matter to you, the extra year of coverage on the Plus is a nice bonus.
Price Comparison
The Breville Bambino (BES450) retails for $300 and is frequently on sale for $250 or less. The Breville Bambino Plus (BES500) retails for $500 and is sometimes found for $400. The price gap is roughly $150–$200 depending on sales.
Which One Should You Buy?
Get the Bambino if: You want to learn espresso skills and milk steaming technique. You are on a tighter budget and would rather put the savings toward a better grinder or better beans. You mainly drink straight espresso or Americanos and do not make many milk drinks. You want the satisfaction of learning latte art.
Get the Bambino Plus if: You want consistent, no-effort milk foam every time without learning manual steaming. You drink a lot of milk-based drinks like flat whites, lattes, or cappuccinos. You frequently use alternative milks (oat, almond, soy) that benefit from adjustable temperature. You make multiple drinks back to back and want auto-purge for faster workflow. You prefer the longer 2-year warranty.
One Important Note: You Still Need a Grinder
Neither the Bambino nor the Bambino Plus includes a built-in grinder. Both ship with pressurized baskets that work with pre-ground coffee, which is fine for getting started. But to get the best espresso from either machine, you will need a separate burr grinder capable of an espresso-fine grind.
This is actually worth factoring into your budget. If you are choosing between a $500 Bambino Plus with no grinder and a $250 Bambino plus a $200 grinder, the Bambino + grinder combo will produce better espresso. The grinder matters more than the steam wand for shot quality.
For grinder recommendations, check out our guide to the best coffee grinder under $100 and our complete coffee grinder guide.
Care and Maintenance
Both machines require the same maintenance: regular backflushing with the included cleaning disc, wiping the steam wand after every use, and periodic descaling. Our Breville Bambino descaling guide covers the process step by step. Using filtered water will reduce how often you need to descale and keep your espresso tasting its best.
Conclusion
Both machines pull identical espresso. The entire price difference comes down to the automatic steam wand, auto-purge, adjustable milk settings, and an extra year of warranty on the Plus.
For most beginners, we recommend the standard Bambino and putting the $150–$200 savings toward a quality grinder. The grinder will have a bigger impact on your espresso quality than an automatic steam wand. But if milk drinks are your primary focus and you value convenience over learning technique, the Bambino Plus is a worthwhile upgrade.
Either way, you are getting one of the best entry-level espresso machines available. For more options across different budgets, see our guides to the best espresso machines and the best espresso machines under $200.
Best Low Acid Coffee: Top 8 Choices
If you deal with acid reflux, GERD, or just a sensitive stomach, your morning coffee might be doing more harm than good. The culprit is not the caffeine — it is the acidity. Low-acid coffee has exploded in popularity as more people realize they do not have to give up their daily cup to feel better. These coffees have a higher pH level (closer to neutral on the 0–14 scale) and contain fewer of the compounds — like chlorogenic acid and quinic acid — that trigger stomach discomfort, heartburn, and enamel erosion.
The good news is that low-acid coffee does not mean low-flavor coffee. The best options deliver a smooth, full-bodied cup that goes easy on your gut without sacrificing the taste and ritual you love. Below are the best low-acid coffee beans you can buy right now, followed by practical tips on roasting and brewing to reduce acidity even further.
Best Low Acid Coffee Beans
Several factors determine how acidic a coffee is: the bean origin, altitude where it was grown, roast level, and how it is brewed. On the pH scale, most regular coffee lands somewhere between 4.5 and 5.0. Low-acid coffees generally measure pH 5.0 or higher. For reference, water is neutral at 7.0, and battery acid sits at the extreme end near 1.0. The coffees below are specifically chosen or processed to minimize acidity while maximizing flavor.
1: Lifeboost Coffee Whole Bean Medium Roast
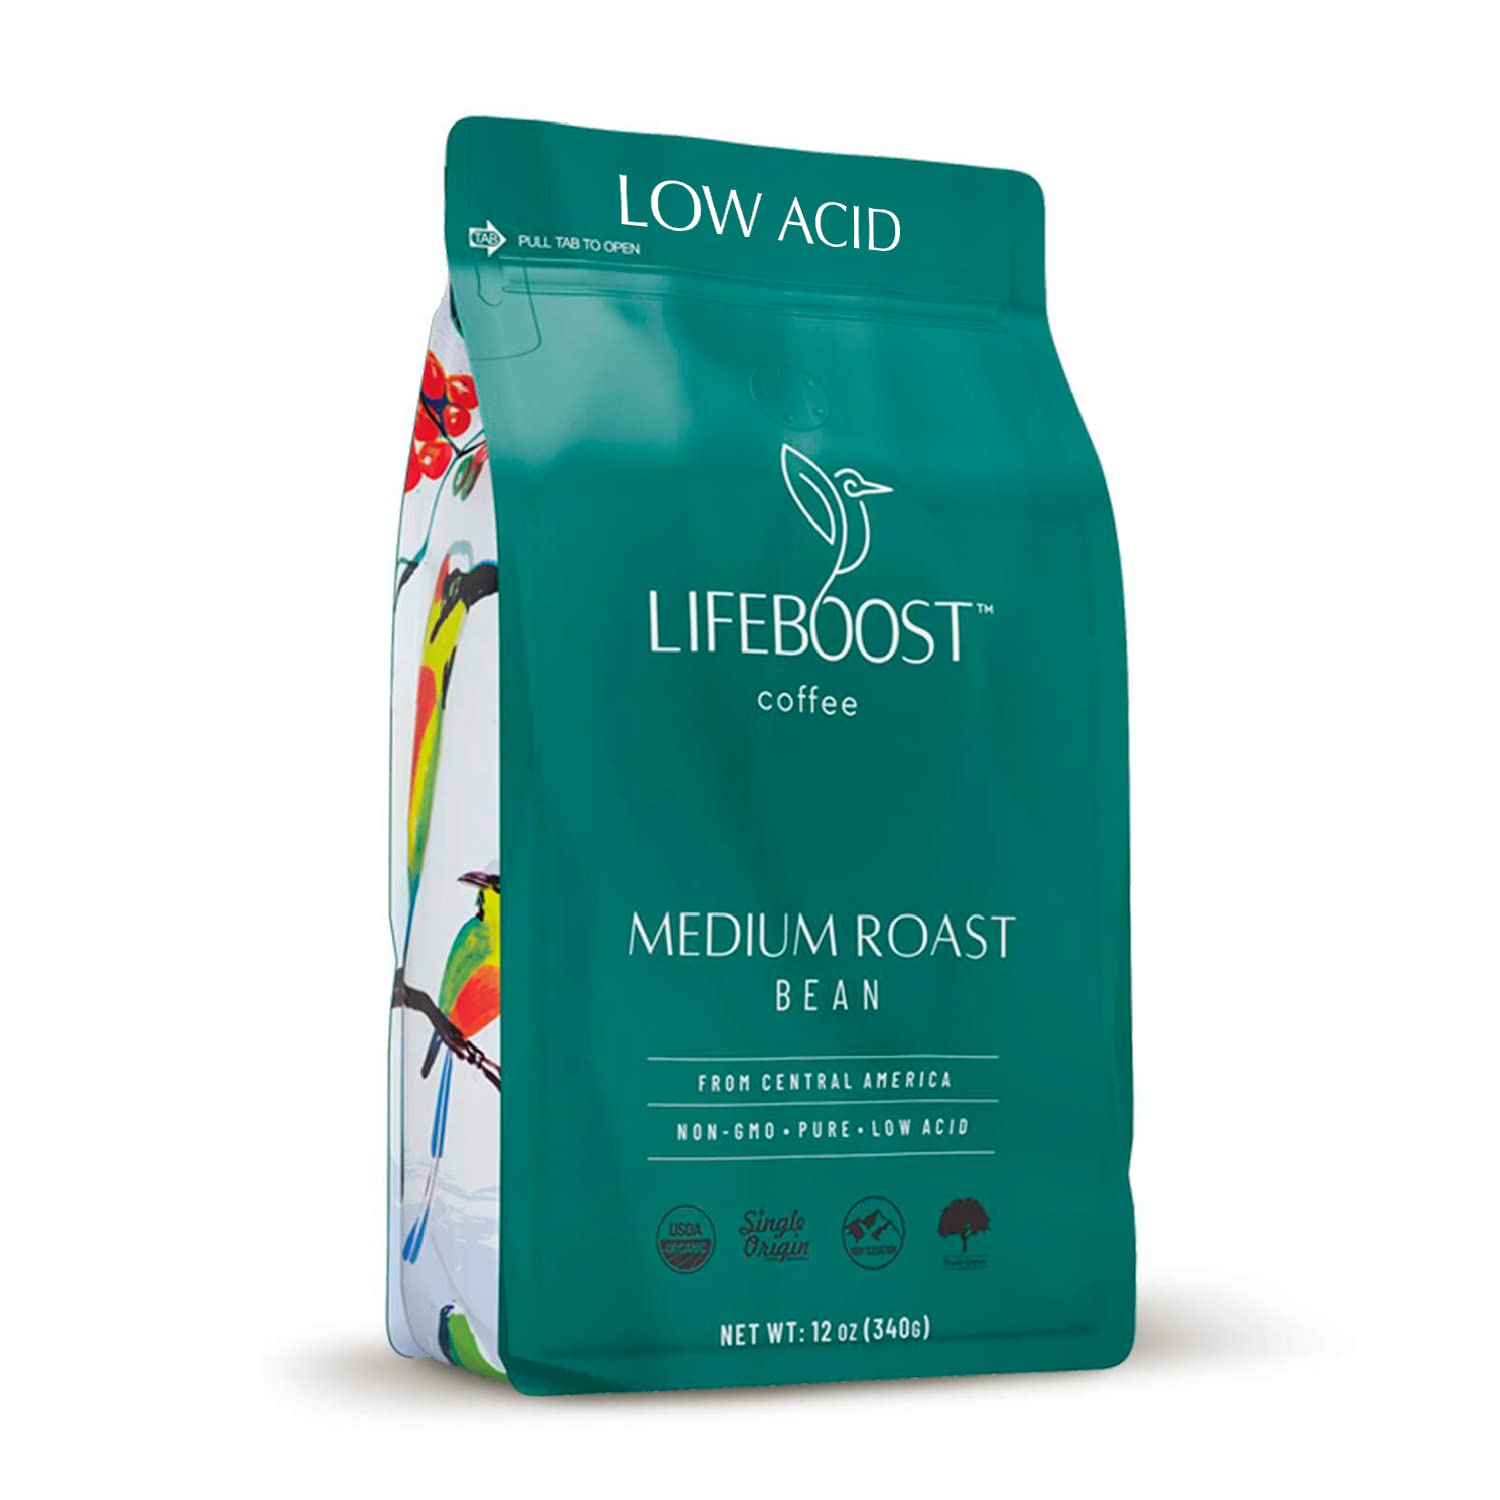
Lifeboost is the gold standard in low-acid coffee and our top overall pick. Their beans are shade-grown at high elevation in the mountains of Central America, hand-selected, sun-dried, and spring water washed. What sets Lifeboost apart is their TrustPure process: every batch is third-party tested for mycotoxins, heavy metals, pesticides, and over 400 other toxins. Their pH consistently measures 6.0 or higher — well above the average cup of coffee at 4.85. The medium roast delivers a balanced, smooth flavor that works beautifully whether you brew with a French press, drip machine, or espresso setup. Available in both whole bean and ground.
- pH of 6.0+ (significantly less acidic than most coffees)
- USDA certified organic, non-GMO, single origin
- Third-party tested for 400+ toxins including mycotoxins and heavy metals
- Available in whole bean, ground, K-Cups, and cold brew grind
2: Volcanica Low Acid Coffee Medium Roast

Volcanica is a strong runner-up with an ultra-low pH level of about 5.2–5.3, making it noticeably gentler than most coffees on the market. This medium roast is a blend of naturally low-acid beans from Brazil, Sumatra, and other Arabica sources grown at lower altitudes — a key factor in reducing acidity. Flavor notes of chocolate, nuts, and a hint of tangerine give it complexity without sharpness. It is also one of the few coffees on this list that is both vegan and kosher certified. If you are looking for a pre-ground option that keeps things simple, Volcanica is an excellent choice. The water you use can further affect the acidity of your cup, so consider pairing it with filtered water for the best results.
- Ultra-low pH of approximately 5.2–5.3
- Kosher, vegan, and gluten-free
- Smooth, full-bodied flavor with chocolate and nut notes
- Available in whole bean and ground
3: Stone Street Cold Brew Low Acid Dark Roast

Stone Street is roasted in Brooklyn, New York, and their dark roast Supremo beans are sourced from the largest, highest-quality Colombian beans available. The darker roast profile naturally breaks down more of the sharp acids, and when you combine that with the cold brewing process, you get an exceptionally smooth, low-acid concentrate. The nutty-chocolate flavor is rich without being harsh. While it is designed for cold brew, these whole beans can just as easily be ground for moka pot, drip, or percolator brewing. Stone Street also sources organic, fair trade, rainforest-safe, and kosher beans.
- Colombian Supremo dark roast — naturally lower in acid
- Ideal for cold brew concentrate (ultra-low acidity when cold brewed)
- Nutty-chocolate flavor profile
- Roasted in the United States; kosher certified
4: Purity Coffee EASE Dark Roast

Purity Coffee has quickly become one of the most respected names in the health-focused coffee space, and their EASE blend was created specifically for people who need a low-acid option. It is a dark roast designed to maximize melanoidins (which support gut health) while minimizing sharp acids. Purity uses specialty-grade beans — a standard met by less than 1% of coffee produced worldwide — that are regeneratively farmed, Rainforest Alliance certified, and Smithsonian Bird Friendly. Every batch is lab tested for mold, mycotoxins, and pesticides. The flavor is dark chocolate and roasted walnut with a smooth finish. Available in whole bean, ground, and K-Cup pods.
- Formulated specifically for digestive health and low acidity
- USDA certified organic, specialty-grade (top 1% of beans worldwide)
- Regeneratively farmed, Rainforest Alliance and Bird Friendly certified
- Dark chocolate and roasted walnut flavor profile
5: Minimalist Luxe Organic Medium Dark Roast

This non-GMO organic whole bean coffee is made from 100% pure Arabica beans from a single source in Papua New Guinea. Being a single-origin coffee (not a blend) means consistency in flavor and acidity from bag to bag. Grown at high altitude and USDA certified organic, Minimalist Luxe beans are freshly roasted and immediately sealed for freshness. The medium-dark roast hits a sweet spot where acidity drops without introducing the bitterness of an ultra-dark roast. If you enjoy Papua New Guinea coffee, this is a great low-acid way to explore those flavors.
- Single origin Papua New Guinea — not a blend
- USDA certified organic, non-GMO
- High altitude grown for quality and lower natural acidity
- Whole bean — grind to your preferred size
6: Lucy Jo’s Coffee Roastery Low Acid Blend

Lucy Jo’s claims to be approximately 70% less acidic than a traditional cup of coffee, which is one of the most dramatic reductions on this list. This certified organic, medium-dark roast uses 100% Arabica beans from Indonesia and Brazil. It is a family-run operation with small-batch roasting done in Upstate New York. The flavor is smooth and sweet with a hint of spice — very approachable for daily drinking. It is also one of the more affordable low-acid options you will find, making it a solid choice if you go through coffee quickly.
- Approximately 70% less acid than traditional coffee
- Certified organic, small-batch roasted
- Smooth, sweet flavor with a touch of spice
- Budget-friendly compared to premium low-acid brands
7: Java Planet Colombia Low Acid Medium Dark Roast

Java Planet is a Rainforest Alliance member that delivers a full-bodied Colombian coffee known for its fruit-forward tones. The medium-dark roast is USDA certified organic and non-GMO, roasted in small batches for quality control. Java Planet is transparent about their sourcing and dedicated to fair wages and sustainable farming practices. One thing worth noting: there are no official certifications for “low acid” coffee — Java Planet’s reputation for gentleness comes largely from consistent customer feedback, which is honest and worth respecting. Multiple bag sizes are available.
- USDA certified organic, non-GMO
- Rainforest Alliance member with fair-wage sourcing
- Full-bodied Colombian with fruit tones
- Available in multiple bag sizes
8: Black Rifle Coffee Ground Medium Roast

Black Rifle’s medium roast was developed to be a smooth, low-acid drip coffee with natural vanilla and cocoa aromas. The blend of Colombian and Brazilian beans is sourced carefully and roasted for a bold but easy-drinking experience. Available in both ground and whole bean formats. Beyond the coffee itself, Black Rifle has a strong mission: the company is committed to hiring U.S. military veterans and has also provided employment opportunities for Afghan refugees. If you want a quality low-acid coffee and like supporting a veteran-owned business, this is a great option.
- Bold flavor with vanilla and cocoa notes
- Colombian and Brazilian bean blend
- Available in ground and whole bean
- Veteran-owned with a commitment to hiring 10,000+ veterans
What Makes Coffee Acidic (And How to Reduce It)
Understanding what drives acidity in your cup can help you make better choices beyond just picking a different bag of beans.
Bean origin matters. Coffees grown at lower elevations — like many beans from Brazil, Sumatra, and parts of Indonesia — tend to be naturally lower in acid than high-altitude varieties from Ethiopia or Central America. The soil composition, climate, and slower maturation at certain altitudes all play a role.
Roast level is a major factor. Darker roasts break down more chlorogenic acid during the roasting process, which is the primary compound responsible for coffee’s sharp, stomach-churning acidity. However, roasting too dark can increase quinic acid, which causes bitterness. A medium-dark to dark roast is generally the sweet spot for low-acid coffee. If you want to understand the difference in more detail, our guide on light roast vs. dark roast breaks it down.
Processing method counts too. Some roasters use a natural steaming process before roasting to strip away acids without removing flavor. Others rely on slow-roasted, small-batch methods. Look for brands that are transparent about their process.
Low Acid Coffee Brewing Tips
Even with a low-acid bean, how you brew can significantly change the acidity level of your final cup. Here are the most effective ways to reduce acidity at home:
Cold brew is king for low acid. The cold brewing process extracts flavor from grounds over 12–24 hours using cold or room-temperature water. Because heat is the main driver of acid extraction, cold brew produces a concentrate that is significantly smoother and less acidic than any hot brewing method. You can learn more about the differences in our cold brew vs. iced coffee comparison.
Use a coarser grind. Finer grounds have more surface area, which means more acid gets extracted into your cup. A coarser grind — like what you would use for a French press — reduces extraction and produces a smoother result. If you are unsure about grind size, a burr grinder gives you the most control.
Filter your water. The minerals in your tap water can amplify acidity in your brewed coffee. Using filtered water — even a simple pitcher or carbon filter — can make a noticeable difference. For an even deeper dive, check out our guide on the best water for coffee and espresso.
Add a pinch of salt. This old trick works: adding a tiny pinch of salt to your coffee grounds before brewing neutralizes some of the acids without changing the flavor noticeably.
Try a different brewing method. Espresso, with its short brew time, and pour-over methods like the Chemex tend to produce less perceived acidity than standard drip machines. If you are interested in exploring, we have guides on making espresso without a machine and making coffee without a coffee maker.
Keep your machine clean. Old coffee residue and mineral buildup inside your machine can contribute off-flavors and increased acidity. Regular descaling is important — we have step-by-step guides for descaling a Keurig, Breville espresso machines, and Nespresso Vertuo.
Conclusion
Our top pick remains Lifeboost Coffee for its verified pH of 6.0+, rigorous third-party testing, and excellent flavor. It is the safest bet if you want a coffee that is genuinely easy on your stomach and backed by real data — not just marketing language. If you are on a tighter budget, Lucy Jo’s offers an impressive 70% acidity reduction at a lower price point. And if cold brew is your thing, pairing Stone Street’s dark roast with the cold brew process gives you the absolute lowest acidity you can get at home.
The key takeaway: you do not have to choose between loving coffee and feeling good after drinking it. Between the right beans, the right roast, and the right brewing method, a comfortable cup is very achievable.
Pitcher Filters and Carbon Filters for Coffee: A Practical Guide
Not everyone needs a full reverse osmosis setup to make great coffee at home. If your tap water is reasonably good — not extremely hard, no funky smells or tastes — a simple pitcher filter or carbon filter might be the only upgrade you need. These filters won’t rebuild your water’s mineral profile from scratch, but they will remove the things most likely to ruin your coffee: chlorine, chloramines, sediment, and various off-flavors.
This guide covers how pitcher filters and carbon filters work for coffee, what they can and can’t do, the different types available, and how to decide which one is right for your brewing setup. For a broader look at water quality and coffee, see our complete guide to the best water for coffee and espresso.
What Carbon Filters Actually Do
Most pitcher filters and faucet-mount filters use activated carbon as their primary filtration medium. Some also include ion-exchange resin. Here’s what each does:
Activated carbon works through adsorption — contaminants stick to the surface of the carbon as water passes through. It’s highly effective at removing chlorine, chloramines, volatile organic compounds (VOCs), and the taste and odor issues they cause. This is the single biggest improvement for most home coffee brewers, because even trace amounts of chlorine that you can’t taste in a glass of water become more noticeable once the water is heated and used to extract coffee.
Ion-exchange resin attracts and captures certain dissolved metals like lead, copper, cadmium, and mercury. It can also slightly reduce water hardness, though not dramatically enough to solve a hard water problem.
What carbon filters do NOT do effectively: they don’t remove dissolved minerals (calcium, magnesium, sodium) in meaningful quantities. They don’t lower TDS significantly. They don’t remove fluoride, nitrates, or most dissolved solids. For those, you need reverse osmosis.
This is actually a good thing for coffee. If your tap water has a reasonable mineral balance (TDS between 75 and 200 ppm), you don’t want to strip those minerals out — you need them for proper extraction. A carbon filter removes the bad stuff (chlorine, off-flavors) while leaving the good stuff (calcium, magnesium) mostly intact.
Pitcher Filters for Coffee
Pitcher filters are the entry-level option. Fill the top reservoir, water gravity-drains through the filter cartridge, and you pour filtered water from the pitcher. No installation, no plumbing, no tools needed.
How They Work for Coffee
For coffee specifically, a pitcher filter’s main job is chlorine removal. Chlorine reacts with compounds in coffee during extraction, intensifying bitterness and creating off-flavors that mask the more delicate sweet, fruity, and floral notes. Removing it is the single easiest way to improve your coffee’s taste at home.
Pitcher filters also reduce sediment and particulates, which helps if your tap water has any visible cloudiness. Some higher-end models (like the Brita Elite or Clearly Filtered) go further, reducing lead, asbestos, benzene, and other contaminants — though these are health concerns more than coffee flavor concerns.
Brita Standard vs. Brita Elite
Since Brita dominates the pitcher filter market, it’s worth understanding the difference between their two main filter types:
| Feature | Brita Standard (OB03) | Brita Elite (OB06) |
|---|---|---|
| Filter Media | Activated carbon + ion-exchange resin | Advanced carbon core + ion-exchange resin |
| Chlorine Reduction | Yes (taste and odor) | Yes (taste and odor) |
| Lead Reduction | No | Yes (99%) |
| Contaminants Reduced | 5+ | 30+ |
| Filter Life | 40 gallons / ~2 months | 120 gallons / ~6 months |
| Mineral Removal | Minimal | Minimal |
| Cost Per Filter | ~$5–$7 | ~$10–$13 |
| Impact on Coffee | Removes chlorine, improves taste | Same chlorine benefit + cleaner baseline |
For coffee-only purposes, both filters accomplish the same primary goal: getting chlorine out of your water. The Elite is a better value long-term (longer filter life, more contaminant reduction) but either one will make a noticeable difference in your cup.
Other Pitcher Filter Brands Worth Considering
Clearly Filtered: Uses a proprietary multi-stage filtration that removes over 200 contaminants, including fluoride and PFAS. More expensive ($30+ per filter) but the most thorough pitcher filtration available. For coffee, it removes chlorine just as effectively as Brita while also handling harder-to-remove contaminants.
ZeroWater: Uses a 5-stage filtration process that removes virtually all dissolved solids, bringing TDS down to 0 or near-0. This is actually a problem for coffee — you’re essentially creating something close to distilled water, which produces flat, lifeless brews. If you use ZeroWater, you’d need to add minerals back in (like Third Wave Water packets), which somewhat defeats the purpose of a simple pitcher setup. Not recommended for coffee unless you want to go the DIY remineralization route.
Peak Water: This is a lesser-known option designed specifically for coffee and tea. The Peak Water pitcher lets you adjust the filtration level so you can control how much hardness gets removed. It’s more expensive and harder to find than Brita, but it’s the only pitcher filter specifically engineered with coffee extraction in mind.
Pros and Cons of Pitcher Filters for Coffee
| Pros | Cons |
|---|---|
| No installation needed | Slow filtration (2–10 minutes per fill) |
| Very affordable ($20–$45 for pitcher + first filter) | Limited capacity (6–12 cups per fill) |
| Removes chlorine effectively | Won’t fix hard water problems |
| Preserves beneficial minerals | Frequent filter changes (every 2–6 months) |
| Great for renters — fully portable | Takes up counter or fridge space |
| Easy to use — no learning curve | Single-stage filtration only |
Faucet-Mount Carbon Filters
Faucet-mount filters attach directly to your kitchen faucet and filter water as it flows through. They use the same activated carbon and ion-exchange resin technology as pitcher filters, but with a couple of advantages: the water is filtered on demand (no waiting for gravity), and you get an unlimited supply without refilling a pitcher.
For coffee, faucet-mount filters are great for convenience. Fill your kettle or coffee maker directly from the tap and the water is filtered as it flows. Brands like PUR and Brita both offer faucet-mount options in the $20 to $40 range, with replacement filters costing $10 to $20 and lasting 2 to 3 months.
The downsides: not all faucets are compatible (especially pull-down sprayers), they can reduce water flow, and they’re slightly less effective than under-sink systems since contact time with the filter media is shorter at full flow.
Under-Sink Carbon Filters
Under-sink carbon filters connect to your cold water line and deliver filtered water through either your existing faucet or a dedicated filtered water tap. They represent a meaningful step up from pitcher and faucet-mount filters in both filtration quality and convenience.
Why They’re Better for Coffee
Under-sink carbon systems typically use carbon block filters rather than the granular activated carbon found in most pitchers. Carbon block filters have a denser structure, which means longer contact time with the water and more thorough removal of chlorine, chloramines, VOCs, and particulates. Many are rated to sub-micron filtration (0.5 microns or smaller), which catches more contaminants than a standard pitcher filter.
Multi-stage under-sink systems may combine carbon block with additional filtration media for broader contaminant reduction. Some popular options for coffee enthusiasts include the Everpure H-1200 (specifically designed for coffee and ice applications) and various Aquasana systems that use their proprietary multi-stage carbon technology.
The convenience factor is significant too. You get filtered water on demand at full tap pressure — no waiting for a pitcher to drain, no counter clutter. If you brew multiple cups a day or use a drip machine that takes a full carafe of water, an under-sink system makes daily life much easier.
Under-Sink Carbon vs. Under-Sink RO
It’s worth understanding the difference, since both install under the sink:
| Feature | Under-Sink Carbon | Under-Sink Reverse Osmosis |
|---|---|---|
| Chlorine Removal | Excellent | Excellent |
| Dissolved Mineral Removal | Minimal | Near-complete (95–99%) |
| TDS Reduction | Slight | Dramatic |
| Preserves Beneficial Minerals | Yes | No (must remineralize) |
| Scale Prevention | No | Yes (when properly set) |
| Cost | $50–$150 | $150–$500 |
| Wastewater | None | Yes (varies by system) |
| Best For | Decent tap water, chlorine/taste issues | Hard water, espresso machines, full control |
If your tap water’s TDS is in a good range (75–200 ppm) and you mainly brew drip coffee or pour-over, an under-sink carbon filter is probably all you need. If you have hard water, an espresso machine to protect, or you want complete control over your mineral profile, step up to reverse osmosis with remineralization.
Which Carbon Filter Setup Is Right for You?
Here’s a quick decision framework based on your situation:
You rent your place and can’t modify plumbing: Get a pitcher filter. A Brita with Elite filters is the best balance of cost, convenience, and filtration quality. If you want the absolute best pitcher filtration regardless of cost, look at Clearly Filtered.
You own your home and brew 1–3 cups per day: A pitcher filter still works fine here. If you’re tired of refilling and want more convenience, a faucet-mount filter is a step up without installation hassles.
You own your home and brew heavily (multiple people, full carafes, etc.): Go with an under-sink carbon filter. The convenience of on-demand filtered water at full pressure will save you time and annoyance every single day.
You have hard water (TDS over 250 ppm): Carbon filters alone won’t solve your problem. You need reverse osmosis with remineralization, or at minimum a water softener upstream of your carbon filter.
You have an espresso machine: If your water is hard, skip straight to RO. If your water is moderate (TDS 75–200 ppm), a good under-sink carbon filter can work, but you should still monitor your machine for scale buildup. Espresso machines are expensive to repair, and scale is the number one cause of failures. Our RO guide covers this in detail.
Tips for Getting the Most Out of Your Filter
Change filters on schedule. This sounds obvious but it’s the most common mistake. An expired filter doesn’t just stop working — it can actually release accumulated contaminants back into your water. Set a phone reminder or use the filter indicator if your pitcher has one. Brita Standard filters last about 40 gallons (2 months), while Elite filters last about 120 gallons (6 months).
Use cold water. Carbon filters are designed for cold water. Hot water reduces filtration effectiveness and can damage the filter media. Always fill your pitcher or run your faucet filter with cold tap water, then heat it separately for brewing.
Test your water before and after. A cheap TDS meter ($10–$15) can tell you a lot. Test your tap water to see where you’re starting from, then test the filtered water to confirm the filter is working. If the TDS readings are identical, the filter is doing what it’s supposed to — removing chlorine and contaminants while leaving minerals in place. If TDS drops dramatically, your filter may be stripping more minerals than you want.
Don’t over-filter for coffee. Some people are tempted to run their water through multiple filters or use a ZeroWater pitcher that strips everything out. For coffee, you want some minerals in the water — they’re essential for proper extraction. The goal is clean water with balanced minerals, not ultra-pure water.
Start with the filter, then upgrade if needed. A $30 pitcher filter is a zero-risk way to see if better water improves your coffee. If you taste a clear difference (most people do), that tells you water quality matters for your setup and your palate. From there, you can decide if you want to invest in a more advanced system.
Bottom Line
For most home coffee brewers with decent municipal tap water, a simple carbon filter — whether it’s a pitcher, faucet mount, or under-sink system — is the highest-impact, lowest-cost upgrade you can make. It removes the chlorine and off-flavors that mask your coffee’s true potential while preserving the minerals that make extraction work. It won’t fix every water problem, but for the majority of people, it’s the right first step.
If you want to go deeper into water chemistry and full mineral control, check out our guides to reverse osmosis for coffee and espresso and the best water for coffee and espresso.
Reverse Osmosis Water for Coffee and Espresso: What You Need to Know
If you’ve been down the rabbit hole of optimizing your coffee, you’ve probably heard that reverse osmosis water is the way to go — especially for espresso. And there’s truth to that. RO water gives you a clean, consistent starting point that lets you build the exact mineral profile your coffee needs. But it’s not as simple as hooking up an RO system and calling it done. Straight RO water, without remineralization, can actually make your coffee taste worse and damage your equipment.
This guide covers how reverse osmosis works for coffee, why remineralization is non-negotiable, what to look for in an RO system, and how to use mineral packets as an alternative or supplement. If you’re new to the idea of optimizing your brewing water, start with our complete guide to the best water for coffee and espresso for the fundamentals.
How Reverse Osmosis Works
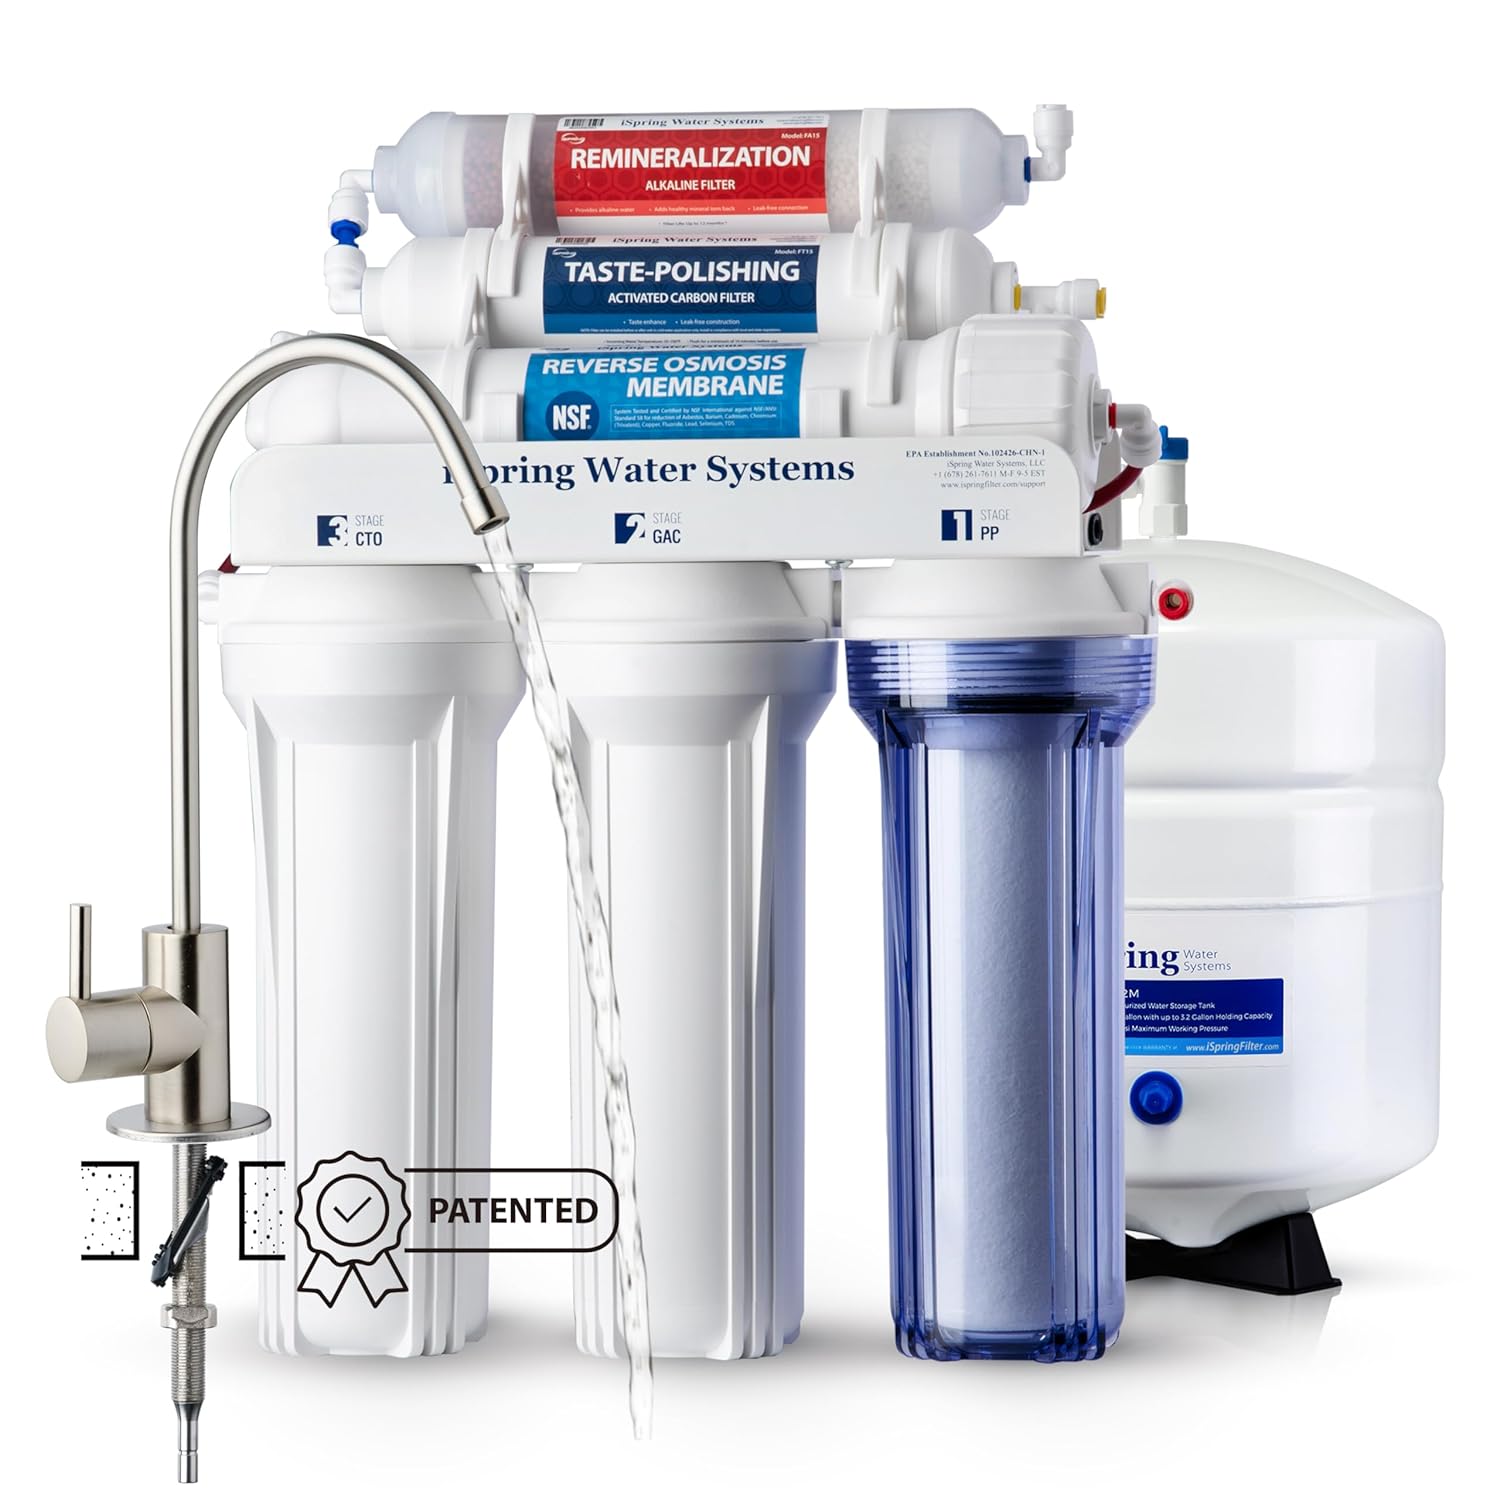
Reverse osmosis forces water through a semipermeable membrane under pressure. The membrane has pores small enough to let water molecules through but block dissolved solids, contaminants, heavy metals, chlorine, fluoride, bacteria, and virtually everything else. Most home RO systems include additional pre-filters (sediment and carbon) to protect the membrane and a post-filter for final polishing.
The result is water that’s been stripped of up to 99% of its dissolved solids. A typical RO system produces water with a TDS between 10 and 25 ppm — far below the 75 to 150 ppm range recommended by the Specialty Coffee Association for brewing.
Why Straight RO Water Is Bad for Coffee
Pure RO water without minerals produces consistently bad coffee. Here’s what happens when you brew with water that’s too pure:
Under-extraction with a twist: You might expect that mineral-free water would under-extract, but it actually extracts too aggressively in the wrong ways. Without minerals to moderate the process, the water rapidly pulls out harsh acids and bitter compounds before the sugars and more complex flavor compounds have time to dissolve. The result is coffee that tastes simultaneously thin and harsh.
Flat, lifeless body: Calcium and magnesium contribute directly to the perception of body and mouthfeel in coffee. Without them, even well-extracted coffee feels watery and hollow.
Weak espresso crema: Minerals help stabilize the crema on espresso. Straight RO water produces thin, pale crema that dissipates quickly.
Equipment damage: This is the one that catches people off guard. Pure, mineral-free water is slightly corrosive. In espresso machines, it can leach minerals from brass boilers, copper piping, and other metal components. Over time, this leads to pitting, corrosion, and premature failure of expensive parts. Some espresso machines won’t even turn on if the water conductivity is too low, as a built-in safety measure.
 Click for Reverse Osmosis Filtration Systems
Remineralization: The Missing Piece
The solution is simple in concept: strip everything out with RO, then add back just the minerals you want in the exact amounts you want. This gives you the purest possible starting point with none of the chlorine, heavy metals, or off-flavors from tap water, plus the precise mineral balance needed for optimal extraction and equipment protection.
There are two main ways to remineralize RO water for coffee:
Built-In Remineralization Stage
Many RO systems designed for coffee and beverage applications include a remineralization cartridge or blending valve as part of the system. A remineralization cartridge passes the purified water through a mineral bed (usually calcite or a calcium/magnesium blend) that adds minerals back in controlled amounts. A blending valve mixes a small amount of pre-filtered (but not RO-treated) source water back into the product water to naturally reintroduce minerals.
Blending valves are particularly popular in coffee-specific RO systems because they let you adjust the TDS of the output water by turning a dial. You can use a TDS meter to set it right at your target — typically 75 to 150 ppm for coffee. The advantage here is it’s fully automatic. Once you set it, every gallon of water comes out at the same mineral level.
Click For Water Mineral Drops
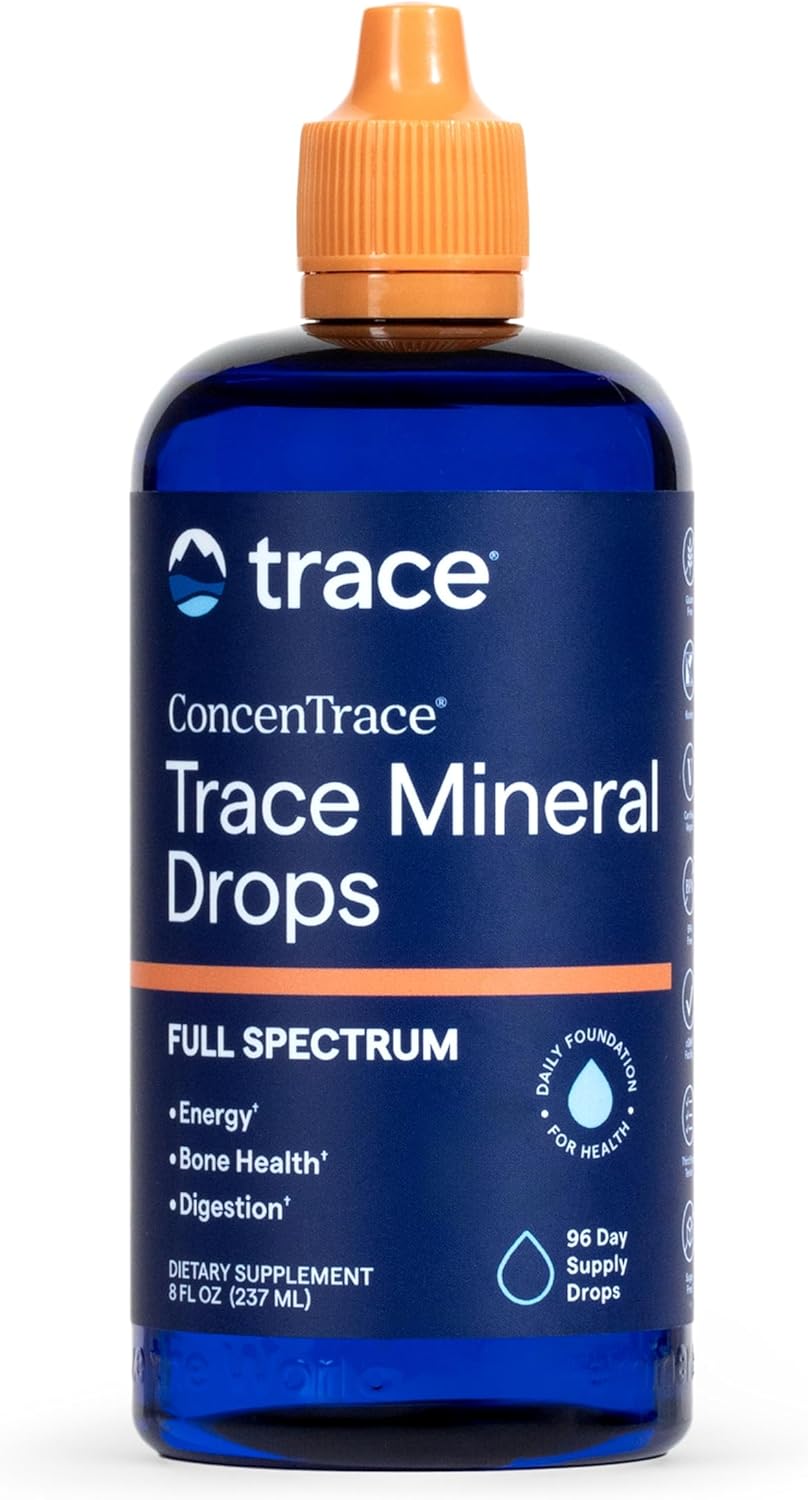
Mineral Packets (Third Wave Water, etc.)
The other approach is to use your RO system to produce pure water, then add pre-measured mineral packets to each gallon. Third Wave Water is the most well-known option in the coffee world. They offer several profiles:
| Profile | Target TDS | Alkalinity | Best For | Key Minerals |
|---|---|---|---|---|
| Classic (Light Roast) | ~150 ppm | ~40 ppm | Pour-over, drip, AeroPress with light/medium beans | Magnesium sulfate, calcium citrate, sodium chloride |
| Espresso | ~150 ppm | ~80 ppm | Espresso machines (all roast levels) | Magnesium sulfate, calcium citrate, potassium bicarbonate |
| Dark Roast | ~180 ppm | ~135 ppm | Drip and manual brew with dark roast beans | Magnesium sulfate, calcium citrate, sodium bicarbonate |
The Espresso profile is specifically designed to avoid chlorides (which cause corrosion in espresso machine boilers under heat and pressure) and uses potassium bicarbonate as its buffer instead of sodium chloride. This is an important distinction — if you’re running an espresso machine, use the espresso-specific formula, not the classic drip formula.
At around $15 to $18 for a 12-pack (one packet per gallon), the cost works out to roughly $1.25 per gallon of optimized water. For home use, that’s very manageable.
RO System Types for Home Coffee Brewing
Under-Sink RO Systems
These are the most common setup for home use. They install beneath your kitchen sink, connect to the cold water line, and typically include a small storage tank. Water passes through 3 to 6 filtration stages (sediment filter, carbon pre-filter, RO membrane, carbon post-filter, and optionally a remineralization cartridge).
For coffee specifically, look for systems that include a remineralization stage or a TDS blending valve. Without one, you’ll need to manually add minerals to every batch of water you use for brewing.
Under-sink systems typically produce 50 to 100 gallons per day and cost between $150 and $500 depending on features and brand. Filter replacements run $40 to $80 per year for the pre and post filters, with the RO membrane needing replacement every 2 to 3 years.
Countertop RO Systems
If you rent or don’t want to modify your plumbing, countertop RO dispensers are a solid alternative. They connect to your faucet or work as standalone units that you fill manually. They’re compact, portable, and require no installation.
The tradeoff is slower production rate and smaller capacity compared to under-sink systems. But for the typical home brewer making 2 to 4 cups a day, they’re perfectly adequate.
Tankless RO Systems
Newer tankless designs skip the storage tank and filter water on demand. They take up less space under the sink and deliver water at a higher flow rate than traditional tank-based systems. They’re a good option if cabinet space is limited.
Setting Up RO Water for Espresso Machines
Espresso machines present some specific challenges when it comes to water treatment:
Plumbed-in machines: If your espresso machine connects directly to a water line, you can plumb the RO system’s output directly into the machine. Make sure the remineralization is dialed in before connecting — you want the output TDS in the 75 to 150 ppm range. Too low and you risk corrosion. Too high and you’ll get scale buildup in the boiler.
Reservoir machines: For machines with removable water tanks, you can mix RO water with mineral packets (like Third Wave Water Espresso Profile) in a separate gallon jug and pour it into the reservoir as needed. This is actually the most precise method since you control the exact mineral content of every gallon.
Remove built-in filters: If you’re using properly remineralized RO water, you don’t need the machine’s built-in water softening cartridge (like those BWT or Brita filters that come with many espresso machines). Using both can strip out too many minerals and defeat the purpose of your remineralization. Remove the in-machine filter and let your RO system do the work.
RO Water vs. Other Filtration for Coffee
| Factor | RO + Remineralization | Carbon Pitcher Filter | Under-Sink Carbon |
|---|---|---|---|
| Chlorine Removal | Yes (completely) | Yes (good) | Yes (very good) |
| Heavy Metal Removal | Yes | Limited | Some models |
| Mineral Control | Full control | Minimal | Minimal |
| Scale Prevention | Excellent (when properly set) | Poor | Poor |
| Coffee Flavor Impact | Maximum improvement | Noticeable improvement | Good improvement |
| Setup Cost | $150–$600 | $20–$45 | $50–$150 |
| Annual Maintenance | $40–$100 (filters) + mineral packets | $30–$60 (replacement filters) | $30–$80 (replacement cartridges) |
| Best For | Espresso machines, hard water areas, flavor optimization | Decent tap water, casual brewers | Better tap water, daily drip brewing |
For a closer look at the simpler filtration options, see our guide to pitcher and carbon filters for coffee. For the big-picture view of water and coffee, check out the best water for coffee and espresso.
How to Dial In Your RO Water
Here’s a practical workflow for getting your RO water right:
Step 1 — Test your RO output. Use a TDS meter to check the water coming out of your RO system before any remineralization. It should read somewhere between 10 and 30 ppm. If it’s higher, your membrane may need replacing.
Step 2 — Remineralize to target. If you’re using a blending valve, slowly adjust it upward while checking TDS until you hit 100 to 150 ppm. If you’re using mineral packets, add one packet per gallon of RO water and shake well. Test with your TDS meter to confirm — Third Wave Water packets should put you right around 150 ppm.
Step 3 — Brew and taste. Make coffee with your remineralized water and compare it to what you’ve been drinking. Most people notice an immediate difference in clarity, sweetness, and overall balance. If the coffee tastes sour or thin, your TDS might be too low. If it tastes muddy or bitter, you may have remineralized too aggressively.
Step 4 — Monitor over time. RO membranes degrade gradually, so check your output TDS monthly. Pre-filters should be replaced every 6 to 12 months, and the RO membrane every 2 to 3 years depending on your source water quality and usage volume.
Common Mistakes with RO Water and Coffee
Using straight RO water without remineralization: This is the most common mistake. Pure RO water tastes flat and can corrode your equipment. Always remineralize.
Using the wrong mineral profile for espresso: If you’re adding mineral packets, make sure you’re using an espresso-specific formula for any water going into an espresso machine. Formulas designed for drip coffee may contain chlorides that cause corrosion under the high heat and pressure of an espresso boiler.
Forgetting to replace filters: RO systems aren’t set-and-forget. Skipping filter changes leads to reduced output quality, slower flow rates, and potential contamination breakthrough. Set a calendar reminder.
Stacking filtration unnecessarily: If you’ve properly remineralized your RO water, you don’t need an additional in-machine water filter. Double-filtering can strip out the minerals you just added.
Is RO Worth It for Coffee?
It depends on your starting point. If you have very hard water (above 250 ppm TDS), live in an area with known water quality issues, or own an espresso machine you want to protect, RO with remineralization is a clear win. It’s the most reliable way to get consistent, optimized water for every brew while protecting your equipment from scale and corrosion.
If your tap water is already decent (75 to 200 ppm TDS, no off-flavors), a simpler carbon filter might be all you need. The best approach is to test your water first, then decide how much treatment it actually requires. Start with our main guide to coffee water if you haven’t already.
For most serious home espresso setups, RO with remineralization pays for itself by extending machine life, reducing descaling frequency, and — most importantly — making your coffee taste noticeably better.
Best Water for Coffee and Espresso: The Complete Guide
You can buy the best beans on the planet, dial in your grind to perfection, and invest in a top-tier espresso machine — but if the water going into your brew is wrong, none of it matters. Water makes up roughly 98% of a cup of drip coffee and about 90% of a shot of espresso. It is the single most overlooked variable in coffee quality, and getting it right can completely transform what ends up in your cup.
This guide breaks down exactly what makes water good (or bad) for brewing coffee, what the Specialty Coffee Association recommends, the types of water you should and shouldn’t use, and how different filtration methods stack up. Whether you’re pulling espresso shots at home or perfecting your morning pour-over, this is everything you need to know about water and coffee.
Why Water Quality Matters So Much for Coffee
Coffee extraction is a chemical process. Hot water dissolves soluble compounds from ground coffee — acids, sugars, oils, and bitter compounds — and the mineral content of that water determines which compounds get extracted, how quickly, and in what proportion. The right mineral balance highlights sweetness, enhances body, and brings out the bright acidity that specialty coffee is known for. The wrong mineral balance produces a cup that tastes flat, sour, bitter, or muddy.
Two cups brewed with the same beans, the same grinder, and the same method can taste wildly different if the water is different. That’s why your favorite coffee shop might taste better than your home setup — they’ve likely dialed in their water.
The Key Water Variables That Affect Coffee
Total Dissolved Solids (TDS)
TDS measures the total concentration of dissolved minerals in water, reported in parts per million (ppm). It includes calcium, magnesium, sodium, bicarbonates, chlorides, and other trace minerals. Think of TDS as a quick snapshot of how “mineral-heavy” your water is.
The Specialty Coffee Association (SCA) recommends brewing water with a TDS between 75 and 250 ppm, with a target of around 150 ppm. Water below 75 ppm tends to under-extract, producing thin and sour coffee. Water above 250 ppm over-extracts, pulling out bitter and chalky flavors while also accelerating scale buildup in your equipment.
TDS is a useful compass but it doesn’t tell you the full story. Two water samples can have identical TDS readings but completely different mineral profiles, which means they’ll extract coffee very differently.
Calcium and Magnesium (Water Hardness)
These are the minerals that do the heavy lifting during extraction. Calcium bonds with acidic compounds in coffee, enhancing tangy and fruity notes. Magnesium binds to flavor compounds that contribute sweetness and aroma. Together, they give your coffee body and depth.
The SCA recommends calcium hardness of 50 to 175 ppm CaCO3. Too little hardness means weak extraction and flat flavor. Too much hardness means bitter, heavy-tasting coffee and limescale deposits that can destroy espresso machines over time.
Alkalinity
Alkalinity is your water’s ability to buffer (neutralize) acids. The SCA recommends alkalinity of around 40 to 75 ppm CaCO3. This matters because coffee is naturally acidic, and alkalinity determines how much of that acidity comes through in the cup.
Low alkalinity lets bright acidity shine — great for light roasts. High alkalinity mutes acidity, which can be helpful for dark roasts but will make light roasts taste flat and lifeless. It’s a balancing act, and getting the alkalinity right is arguably more important than hitting a specific TDS number.
pH
Water with a neutral pH around 7 is ideal for coffee brewing. It allows the natural acidity of the coffee to come through without the water itself introducing unwanted sourness or bitterness.
Chlorine and Chloramines
Municipal water treatment adds chlorine (or chloramines) to kill bacteria, and even trace amounts can create off-flavors in coffee. You may not taste chlorine in a glass of water, but it becomes more noticeable when that water is heated and used to extract delicate coffee compounds. Removing chlorine is one of the easiest and most impactful improvements you can make.
SCA Water Standards at a Glance
| Parameter | SCA Target | Acceptable Range |
|---|---|---|
| TDS | 150 ppm | 75–250 ppm |
| Calcium Hardness | 68 ppm CaCO3 | 50–175 ppm CaCO3 |
| Alkalinity | 40 ppm CaCO3 | 40–75 ppm CaCO3 |
| pH | 7.0 | 6.5–7.5 |
| Sodium | 10 mg/L | At or near 10 mg/L |
| Chlorine | 0 mg/L | 0 mg/L |
| Odor | None | None |
| Color | Clear | Clear |
These standards were developed through extensive research and are used by competition baristas, specialty roasters, and high-end cafes worldwide. For the home brewer, they serve as a reliable target to aim for.
Click For Water Test Kits
Types of Water and How They Affect Coffee
Tap Water
Tap water quality varies enormously depending on where you live. Some regions have naturally soft, low-mineral water that’s close to ideal for coffee. Others have extremely hard water loaded with calcium, magnesium, and other dissolved solids. Tap water almost always contains chlorine or chloramines from municipal treatment.
If your tap water tastes clean and has a TDS between 75 and 200 ppm, a simple carbon filter to remove chlorine may be all you need. If your tap water is very hard (above 250 ppm TDS) or very soft (below 50 ppm TDS), you’ll need more advanced filtration. A cheap TDS meter (around $10–$15 online) can tell you where your tap water falls.
Distilled Water
Distilled water has virtually zero mineral content — typically 0 to 5 ppm TDS. It should not be used for coffee on its own. Without minerals, the water extracts too aggressively, pulling out harsh bitter compounds before the desirable flavors have time to dissolve. The result is thin, sharp, acidic coffee with no body.
Distilled water can also damage equipment over time. Mineral-free water is slightly corrosive and can leach minerals from metal boilers, heating elements, and internal components of espresso machines.
However, distilled water is an excellent starting point if you plan to add minerals back in using products like Third Wave Water mineral packets or an RO system with remineralization.
Reverse Osmosis (RO) Water
Reverse osmosis systems push water through a semipermeable membrane that removes up to 99% of dissolved solids, contaminants, chlorine, and heavy metals. The resulting water is extremely pure, usually measuring somewhere between 10 and 25 ppm TDS.
Like distilled water, straight RO water is too pure for good coffee. It under-extracts, produces flat and lifeless cups, and can erode equipment. But RO water that has been remineralized — either through a built-in remineralization stage or by adding mineral packets — is widely considered the gold standard for coffee water. It gives you a perfectly clean slate to build the exact mineral profile you want.
We cover this in much more detail in our full guide to reverse osmosis water for coffee and espresso.
Bottled Spring Water
Some bottled spring waters land in the ideal TDS range and can produce excellent coffee. The key is checking the label for mineral content. Look for water with a TDS between 75 and 150 ppm and a balanced profile of calcium and magnesium. Brands like Volvic (around 130 ppm TDS) are often recommended by coffee professionals for this reason.
The downside is cost and sustainability. Buying gallons of bottled water for daily brewing adds up quickly and generates a lot of plastic waste. It’s a fine short-term solution or travel hack, but most serious home brewers eventually switch to a filtration setup.
Bottled Mineral Water
Not all mineral water works for coffee. Many popular brands have TDS levels far too high. Water with very high mineral content can produce heavy, muddled flavors and accelerate scale formation in machines. Always check the label before using bottled mineral water for brewing.
Softened Water
Traditional water softeners use ion exchange to replace calcium and magnesium with sodium. This solves the limescale problem but introduces a new one — sodium can add a slightly bitter or salty flavor to coffee. Softened water still needs additional treatment (typically RO) before it’s ideal for brewing.
Water for Espresso vs. Water for Drip Coffee
Espresso and drip coffee have different water demands because the extraction process is fundamentally different. Espresso forces water through tightly packed grounds under high pressure in 25 to 30 seconds. Drip coffee slowly percolates water through a bed of grounds over 4 to 6 minutes.
| Factor | Espresso | Drip / Pour-Over |
|---|---|---|
| Water as % of Beverage | ~90% | ~98% |
| Extraction Time | 25–30 seconds | 4–6 minutes |
| Scale Risk | Very high (boiler, grouphead) | Moderate (heating element) |
| Corrosion Risk | High (brass, copper components) | Low to moderate |
| Ideal TDS Range | 75–150 ppm | 75–150 ppm |
| Alkalinity Sensitivity | Higher (short extraction amplifies it) | Moderate |
For espresso, machine protection is a major concern. Hard water causes limescale buildup inside boilers, heat exchangers, and solenoid valves — the most common reason for expensive espresso machine repairs. At the same time, water that’s too pure (like straight RO or distilled) can corrode the brass and copper components found in most espresso machines. Espresso water needs to walk a tighter line between having enough minerals for flavor and machine protection without having so many that it causes scale.
For drip coffee, the stakes are lower on the equipment side but arguably higher on the flavor side. Because water makes up a larger percentage of the final cup, mineral imbalances are more noticeable in drip than in espresso.
Best Filtration Methods for Coffee Water
Choosing the right filtration method depends on your starting water quality, your brewing method, your budget, and how much effort you want to put in. Here’s a summary of the most common options:
| Filtration Method | Removes Chlorine | Removes Minerals | Best For | Cost |
|---|---|---|---|---|
| Pitcher Filter (Brita, etc.) | Yes | Some (minimal) | Decent tap water that just needs chlorine removal | $20–$45 upfront |
| Faucet-Mount Carbon Filter | Yes | Some (minimal) | Convenient chlorine and taste improvement | $20–$40 upfront |
| Under-Sink Carbon Filter | Yes | Minimal | Better performance and flow than pitchers | $50–$150 upfront |
| Reverse Osmosis (Under-Sink) | Yes | Yes (nearly all) | Hard water or serious coffee optimization | $150–$500 upfront |
| RO + Remineralization | Yes | Yes, then adds back ideal minerals | Gold standard for coffee and espresso | $200–$600 upfront |
| Mineral Packets (Third Wave Water) | No (used with distilled/RO water) | N/A (adds minerals to pure water) | Precision water chemistry on a budget | ~$15–$18 per 12-gallon supply |
We’ve written detailed breakdowns of the two most popular approaches for home coffee brewers: pitcher and carbon filters for coffee and reverse osmosis systems for coffee and espresso.
The Mineral Packet Shortcut: Third Wave Water
If you don’t want to deal with filtration systems, mineral packets offer an easy alternative. Products like Third Wave Water provide pre-measured mineral blends that you add to a gallon of distilled or RO water. Each packet is formulated to hit SCA-recommended targets for TDS, hardness, and alkalinity.
Third Wave Water offers several profiles designed for specific use cases. Their Classic profile targets light and medium roast drip coffee with lower alkalinity to let bright acidity shine through. Their Espresso profile is formulated with potassium bicarbonate instead of sodium chloride, which prevents scale and corrosion in espresso machine boilers. They also offer a Dark Roast profile with higher alkalinity to smooth out bitterness in darker roasts.
The process is simple: buy a gallon of distilled water, add one packet, shake it up, and you have precisely mineralized brewing water. At roughly $1 to $1.50 per gallon, it’s an affordable way to experience what optimized water does for coffee flavor without committing to a filtration system.
How to Test Your Water at Home
Before investing in any filtration, it’s worth testing what’s coming out of your tap. Here are three easy ways to do it:
TDS Meter: A basic TDS pen costs $10 to $15 and gives you an instant reading of your water’s total dissolved solids. It won’t tell you the specific mineral breakdown, but it tells you whether you’re in the ballpark. If your reading is between 75 and 200 ppm, you might be in good shape with just a carbon filter. If it’s over 300 or under 50, you’ll want more serious treatment.
GH and KH Test Kits: Aquarium test kits (like the API GH/KH kit) cost around $8 to $12 and measure general hardness and carbonate hardness separately. This gives you more useful information than TDS alone, since you can see whether your hardness and alkalinity are in balance.
Local Water Report: Most municipal water suppliers publish annual water quality reports online. Search for your city or county water quality report to get detailed information about mineral content, pH, chlorine levels, and contaminants.
Quick-Start Recommendations
Not sure where to begin? Here are some simple starting points based on your situation:
Your tap water tastes fine and your TDS is 75–200 ppm: Start with a basic carbon pitcher filter like a Brita or an under-sink carbon filter to remove chlorine. This is the lowest cost, lowest effort improvement and may be all you need. See our guide to pitcher and carbon filters for coffee.
Your tap water is very hard (TDS above 250 ppm): You’ll want a reverse osmosis system with remineralization. RO strips everything out, and the remineralization stage adds back the right minerals in the right amounts. This also protects your espresso machine from scale. Check out our guide to reverse osmosis for coffee and espresso.
Your tap water is very soft (TDS below 50 ppm): Consider adding minerals. Use Third Wave Water packets with distilled water, or install an RO system with remineralization to create a consistent, optimized water profile.
You want the easiest possible upgrade: Buy a gallon of distilled water, add a Third Wave Water packet (Classic for drip, Espresso for espresso machines), and brew with that. Taste the difference for yourself, then decide if you want a permanent filtration setup.
Bottom Line
Water is the foundation of every cup of coffee you make. Getting it right doesn’t have to be complicated or expensive, but ignoring it means you’re never tasting your coffee at its best. Start by testing your tap water, remove chlorine at a minimum, and aim for a TDS in the 75 to 150 ppm range with balanced minerals. Your coffee — and your equipment — will thank you.